This is a user manual for the Plainly Videos App.
Introduction
Plainly is software for automated video creation. This wiki should provide you with guidance on all parts of our product. Three main parts are:
-
Templates: these are the video templates that you will use as a base for your renders. You can either use custom projects or pre-made Plainly designs.
-
Setup: if you are using a custom template, you will need to set it up in Plainly. This step is done after you your custom template in Adobe After Effects. This step takes only a few minutes, and it’s done completely through our Web App.
-
Rendering: you can render videos in multiple ways, using our Web App, the batch render function or our API. All rendering is done in the cloud, and you can set up webhooks in order to distribute videos further automatically.
Video Tutorials
We created this documentation also in a video format, everything you read here can also be found in the video tutorial library. This is being constantly updated. See the library here.
Designs
Designs are pre-made projects created by the Plainly team. We created these so you can get started asap, without the need to create custom projects. They have the same functionality as the custom projects, and you can render them in the same way as custom projects (single render, batch render, API render).
You can see related API docs for designs here.
You can use these freely with any Plainly subscription without any limitations. Most of them have multiple formats and multiple colors pre-defined but you can also add custom colors throughout the render form.
If you wish to create templates for Plainly, or you want to send a template request, send an email to contact@plainlyvideos.com
Custom projects
Custom projects are video templates that you create in Adobe After Effects.
How to create custom projects
There are no special requirements when creating a custom project. You can create it as you would normally create a video in After Effects. We have best practices that you can follow, but other than that you have full control over the template.
-
Maximum length and dimensions of the template are determined by your subscription.
-
You can use whatever fonts you like.
-
You can use 3D layers and any After Effects native effect.
-
You can’t use paid plugins.
Adding a custom project to Plainly
After your finish creating your template in After Effects, and you want to add it to Plainly, the first step is to properly package it:
-
Go to File > Dependencies > Collect Files
-
Go to the folder where you collected the After Effects files and also copy the font files you used in the project inside.
-
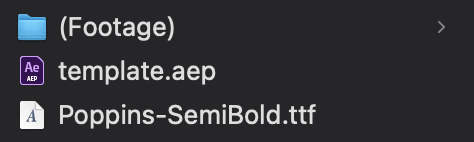
Select the font files, the .aep and the (Footage) folder and create a .zip archive
This is how a proper .zip looks:
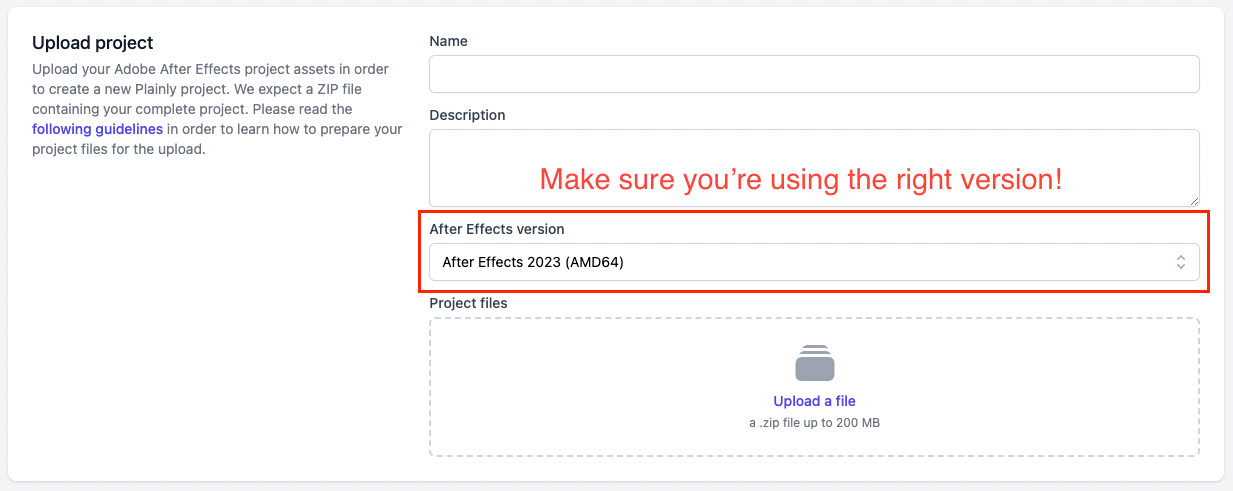
After you create the .zip you need to go to Custom Projects > Upload New and the upload window will open. Make sure that you correctly select the version of After Effects that you used.
|
A few challenges you might face: 1. Template too big - in order to minimize your template size, make sure to check the section below on optimizing After Effects file. You can also use proxy files if you are using high quality MOVs, or link them as a static parameter. 2. Fonts not displaying - Make sure to include the font files in your zip, read more in the font management section. |
Font management
| As stated in Terms of Service, any content you upload, including the fonts, must be your own, or you must have the right to use it. Plainly is not responsible for any copyright infringement. |
In order for Plainly to render your text layers correctly, you need to include all used fonts in the .zip that you upload. Best practise is to place font files in the root of a .zip file.
You should be aware of the following rules and limitations:
-
Only fonts in
.ttfor.otfformats are supported. -
Fonts used in non-visible or guide layers are not required to be included in the .zip file.
-
You must not include any font files that are not used in the AfterEffects project.
Once you upload a project .zip file to Plainly, we will analyze the project and check if all fonts are included correctly. In case of a missing font, duplicated font files or unneeded font files, the analysis will fail. The failure message will contain the list of missing, duplicated or extra fonts, in order to help you fix the issue.
| If you are unsure if your current project has correct fonts included, you can execute the project reanalysis from the Project details page. This will trigger a new analysis of the project and will show you if there are any missing, duplicated or extra fonts. |
Parametrization
After the upload, Plainly will take a second to analyze your project.
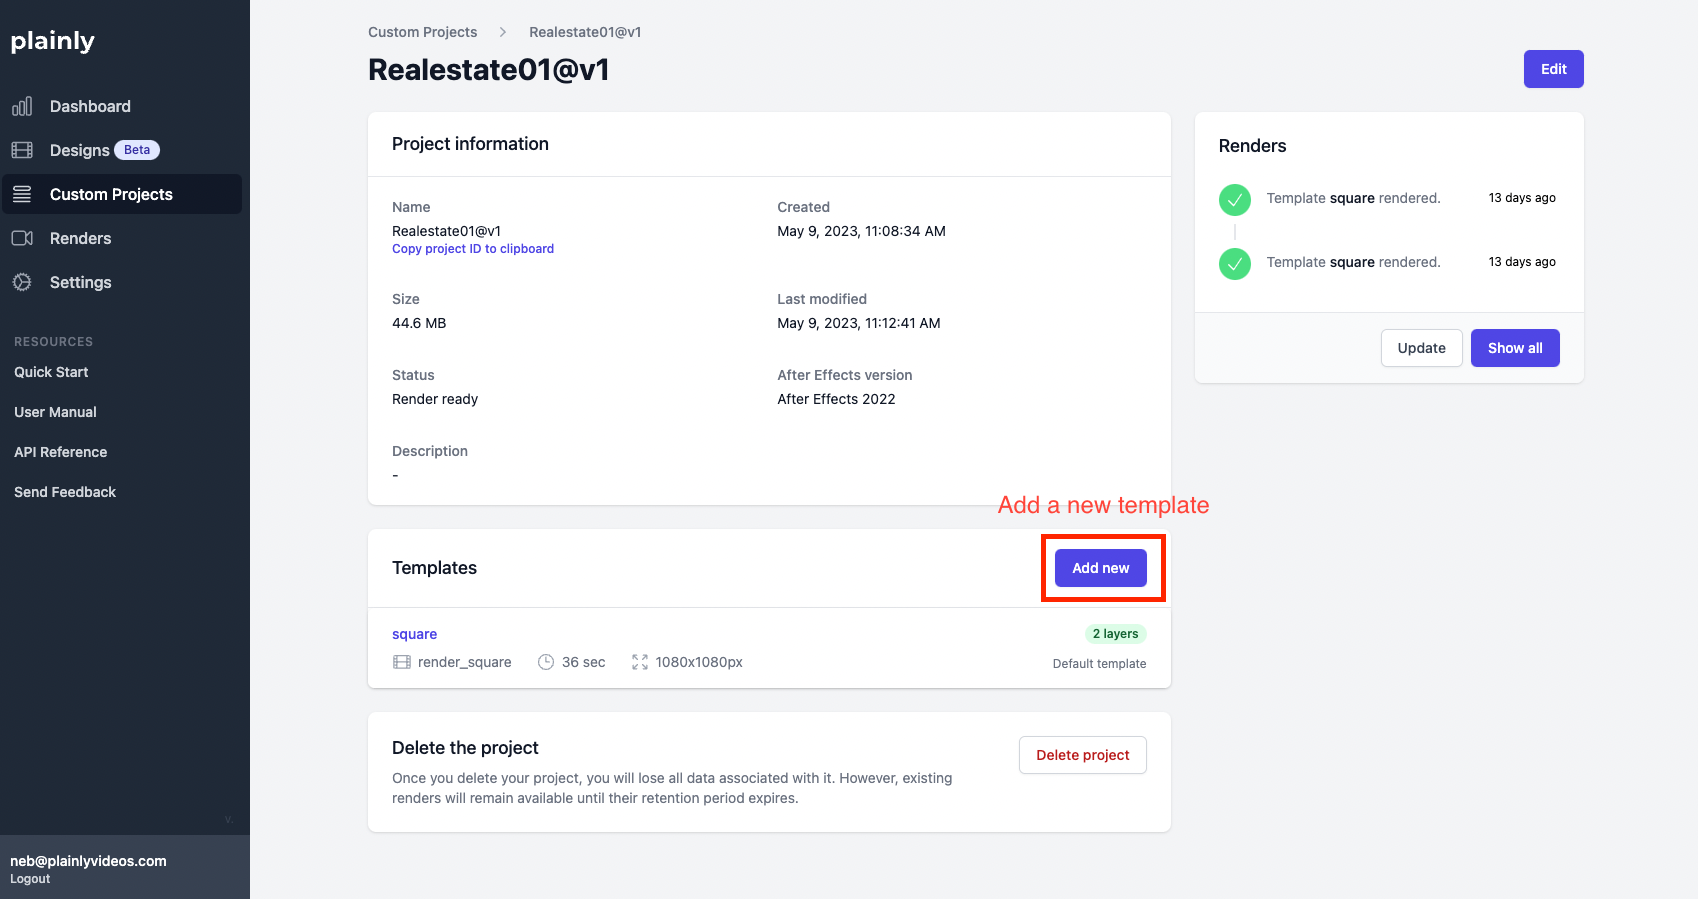
You should then create your templates and add parameters. Templates are a subcategory of a project, and you can have as many templates as you wish in one custom project. The reason why templates exist is to allow you to have multiple variations (for example multiple formats) of one video under one project.
To create a template go to the project page and click on the “Add new” button.
This will open up the parametrization window. In the parametrization window, you will see all of the available layers you can make dynamic. Right now we support dynamic text, video, audio, images and colors. To create a parameter (dynamic layer):
-
Click on the layer you want to make dynamic
-
Select static or dynamic
-
If it’s static, add the new value.
-
If it’s dynamic add the display name and the parameter name.
Go through the list of layers, and make the ones you want to change every render dynamic.
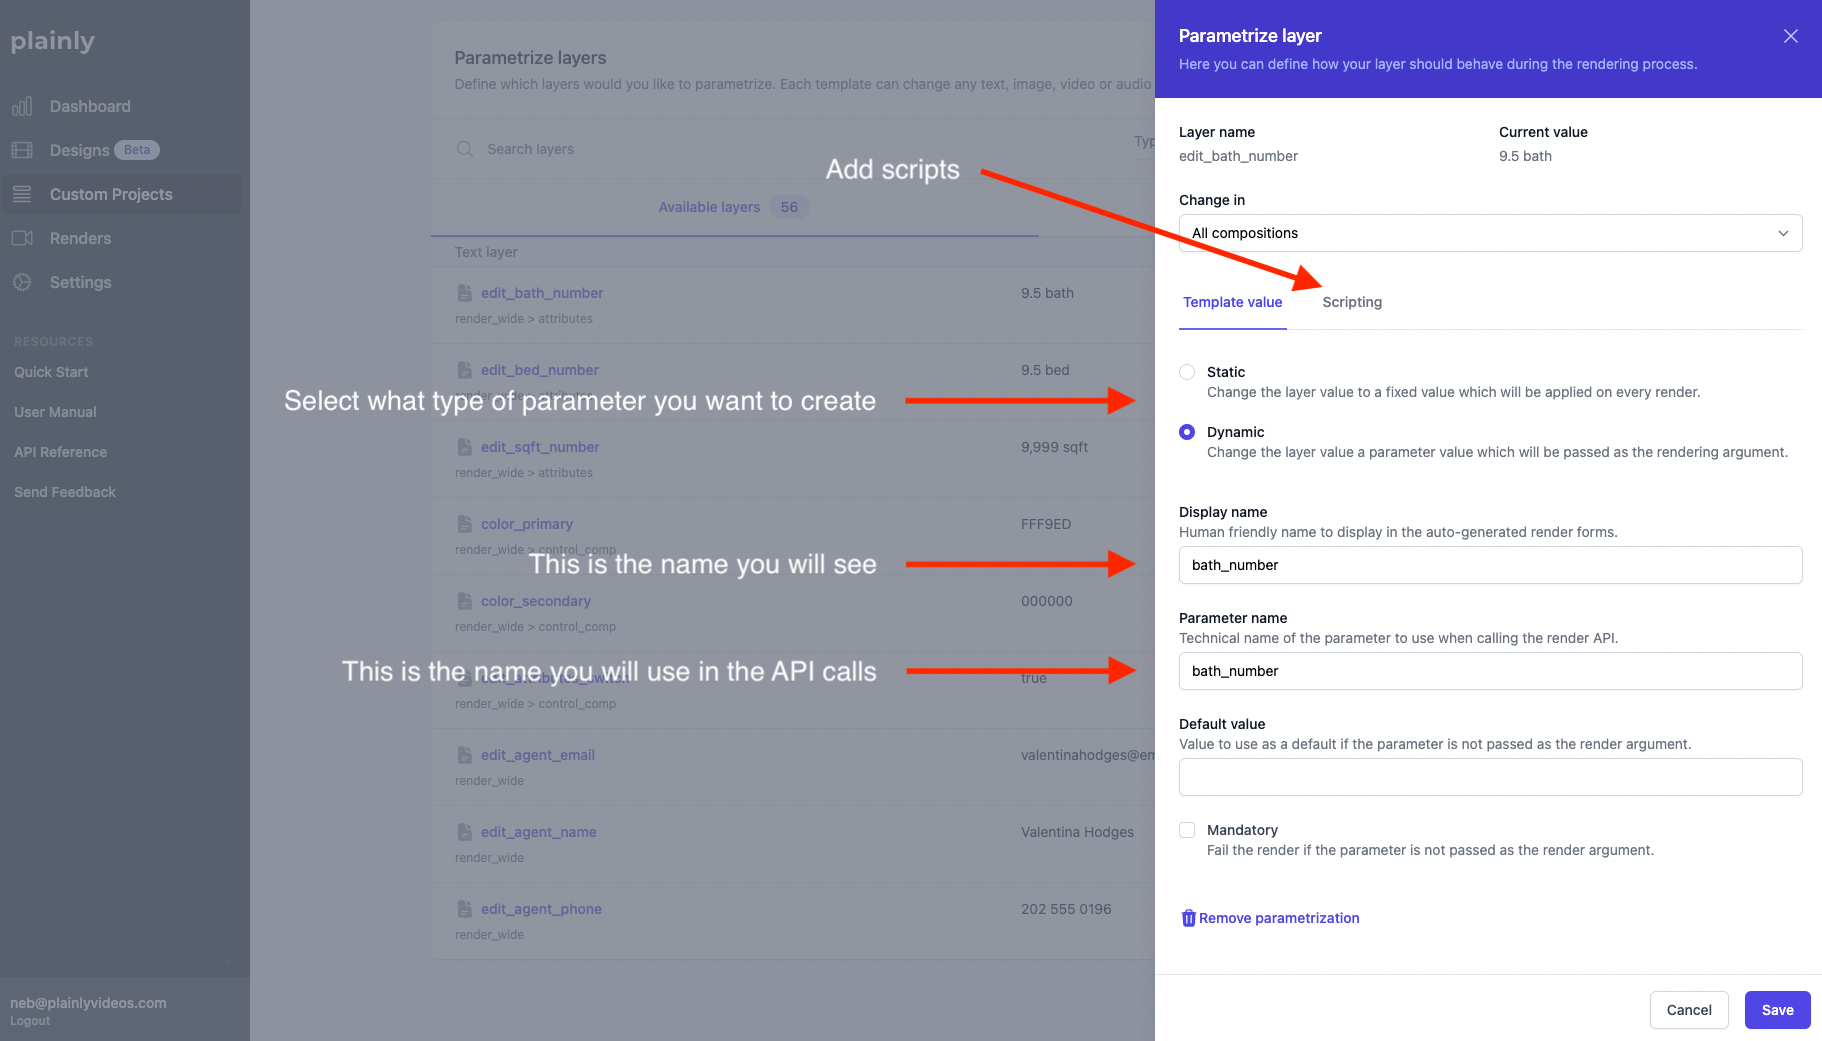
You can also add scripts to layers, scripts are a way to add even more dynamic features to your template.
Scripting
Scripts are features that you can add to certain layers or compositions that will make your project even more dynamic. To add them, click on the “Scripting” tab in the parametrization step.
| Scripts can be applied to compositions, not only layers. You can also apply more than one script to the same element. |
There are two basic groups of scripts available:
-
Static scripts - these define fixed script options during the parametrization and behave the same for every render execution.
-
Dynamic scripts - these pickup script options from render parameters, and thus can behave different for every render execution.
Here’s an overview of all scripts (sorted from the most used to the least used by our users):
Static scripts
Crop
This script will crop the parent composition of the layer based on that layer. This is the most useful script because it allows you to control the final duration of the video based on dynamic layers. For example, you can have a dynamic background video. You can apply the crop script to that video and the final, output video will be the same duration as the background video. Otherwise, the output video will always stay the same duration as it was set in the template.
| Make sure that the asset you’re using in the template is longer than any asset that will be swapped out. The crop script won’t work if the placeholder asset is shorter than the one you’re swapping it out for. |
Shift in
This script will shift a layer to start at the start/end point of another layer. This is a great script if you for example have a background video (with variable length) and an outro. For the outro to start at the end of the background video you will apply the shift in script to the outro layer and pin it to the endPoint of the background video.
Spread layers
Another useful script that allows you to have a dynamic number of layers that get shown depending on the input. Imagine a slide show with 10 images. In the final workflow, you want to be able to send anywhere from 5 to 10 images in your render call. You can add the spread layers script to the main comp, and Plainly will (depending on the number of images you pass) turn off the layers that don’t have any input, and extend the rest of the layers to fill out the composition.
Shift out
Does the same thing as shift in just with the end of the layer.
Extend
This will extend the out point of your layer (the ending) to match the asset that it’s being sent for rendering. This script is useful in cases where you have a placeholder asset that’s a 10 second video, and you want to swap it out with a 20 second video dynamically. If you don’t add the Extend script, After Effects will cut your video after 10 seconds. With the Extend script it will show the full 20 seconds.
Stretch
This will stretch the layer based on an in/out point of another layer.
Trim in/out
This will trim the layer based on another layer in the same composition.
Set duration
This script is used if you want to set a fixed duration in seconds of a specific layer. The duration can be different from the one in the After Effects projects. Setting a duration of zero will effectively make the layer invisible.
Dynamic scripts
Image sequence
This script is for those who want to use an image sequence as a parameter for rendering, and it’s only available when creating a rendering using REST API. To set it up, add this script to a video or image layer, and make sure that you don’t parametrize that layer, just add the script. The script will ask you to add a parameter name. To swap it out for an image sequence during rendering, you need to add that parameter name in the parameters list and send the array containing your image sequence as a parameter.
If you define the parameter with a name image_sequence in the script, here is an example a body for create render JSON that provides an array of images to be used for the sequence creation:
  {
    "projectId": "5bf8483b-a591-476a-afff-0db5fe1ea70f",
    "parameters": {
      "image_sequence": [
        "https://cdn.filestackcontent.com/0ITCVdATSZyyUpP4JRvu",
        "https://cdn.filestackcontent.com/4eOvgf8hR3OcaPTW5wZb",
        "https://cdn.filestackcontent.com/G9JSG5YQhuswnPuCaq8S",
        "https://cdn.filestackcontent.com/Wp7VUtnpTpW82jg0Z2h0",
        "https://cdn.filestackcontent.com/M05K3YEpSHCoeOx2AFTW"
      ]
    }
  }
Layer management
This script allows you to control and define different layer properties during the render execution, and it’s only available when creating a rendering using REST API. The script is applied to the layer you want to control and you only need to provide a parameter name which will be used to pass the layer properties when invoking the render.
Currently, the script supports the following properties:
-
duration- Sets the duration of a layer in seconds. Must be a positive number or a zero. Setting a duration of zero will effectively make the layer invisible. -
startTime- Sets the start time of a layer in seconds relative to the composition it belongs to. Must be a number.
| All supported properties are optional. If they are not provided in the render parameters, the script will not apply any changes to the layer. |
If you define the parameter with a name my_layer_mng in the script, here is an example a JSON body to provide when invoking the render, in order to set duration of a target layer to 5.5 seconds:
  {
    "projectId": "5bf8483b-a591-476a-afff-0db5fe1ea70f",
    "parameters": {
      "my_layer_mng": {
        "duration": 5.5
      }
    }
  }
Here is the example with all supported properties:
  {
    "projectId": "5bf8483b-a591-476a-afff-0db5fe1ea70f",
    "parameters": {
      "my_layer_mng": {
        "duration": 10,
        "startTime": 2
      }
    }
  }
Scene management script
| WARNING: Advanced, for VideoGenius users only |
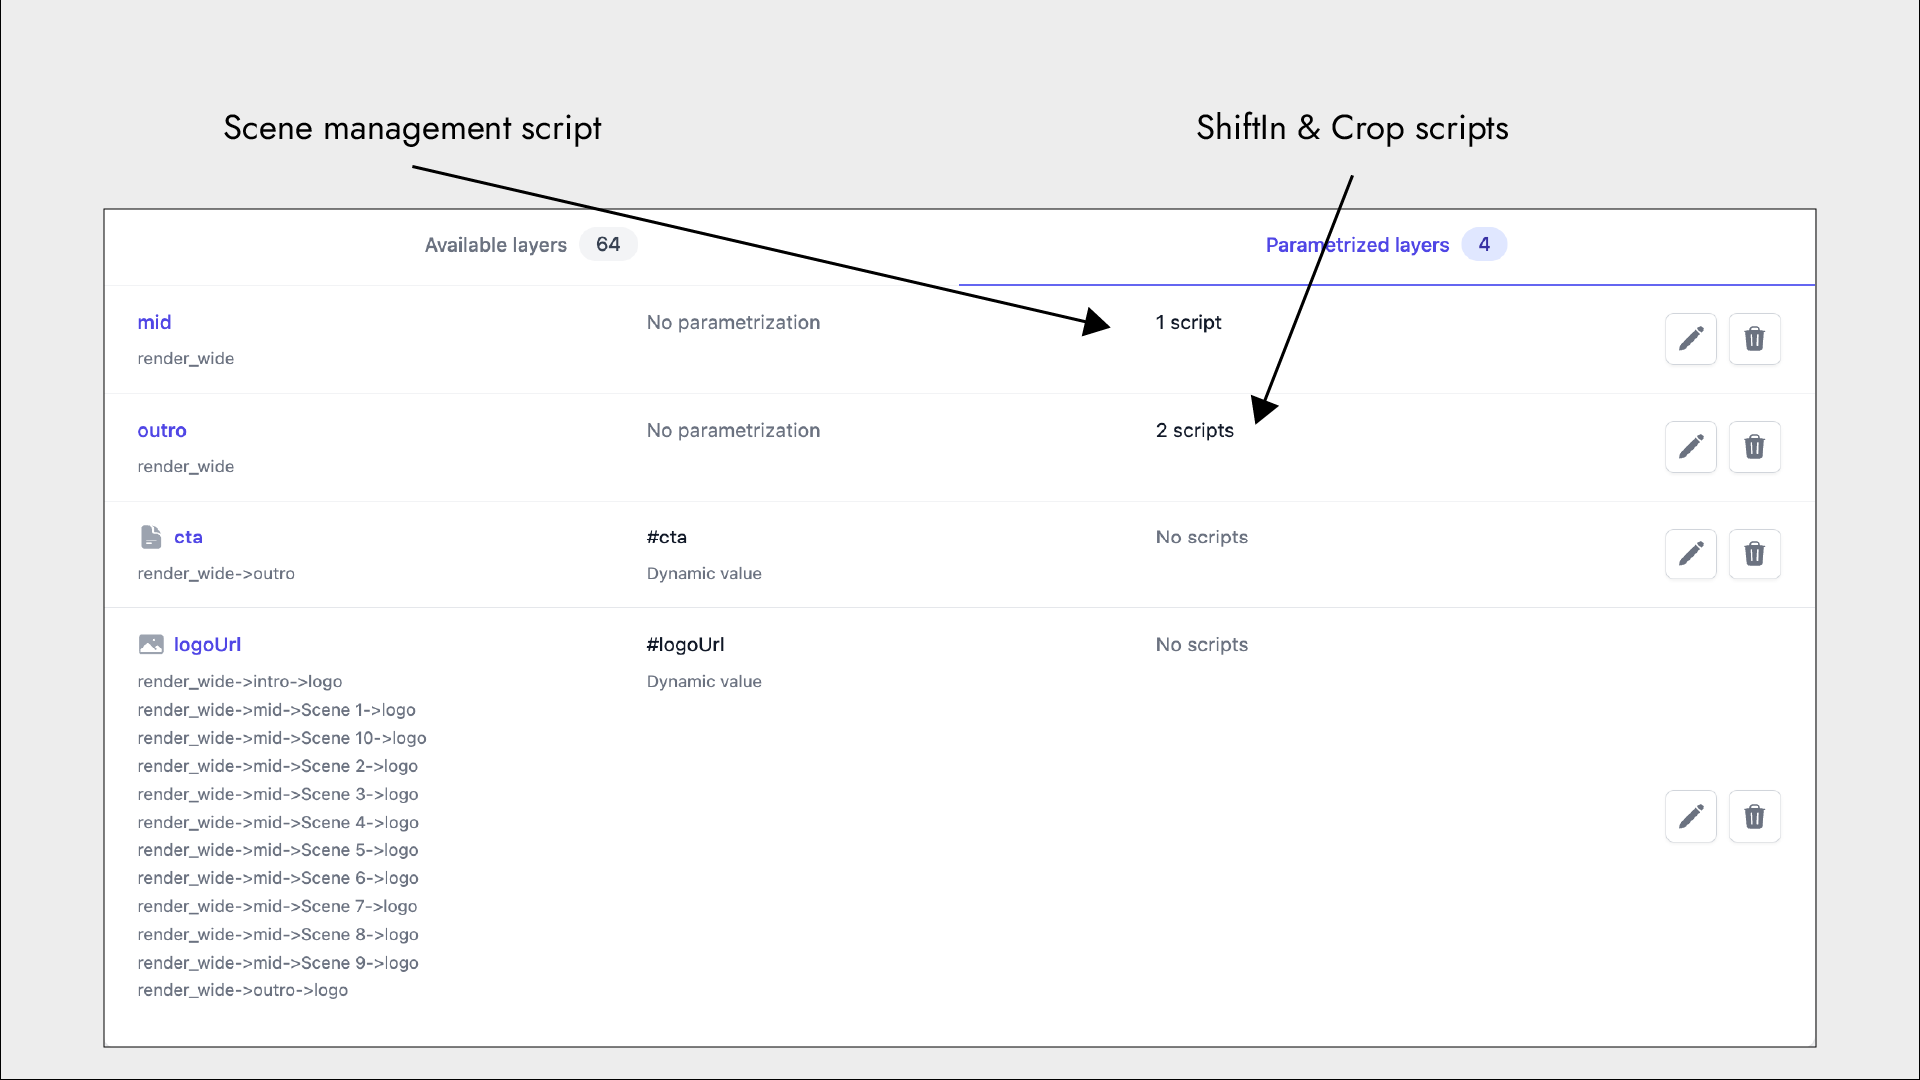
The scene management script is specifically built for templates that will be added to our VideoGenius product. It’s mandatory to add this script in order for custom projects to work with the VideoSynth product. You need to add it to the composition that contains all the Scene compositions.
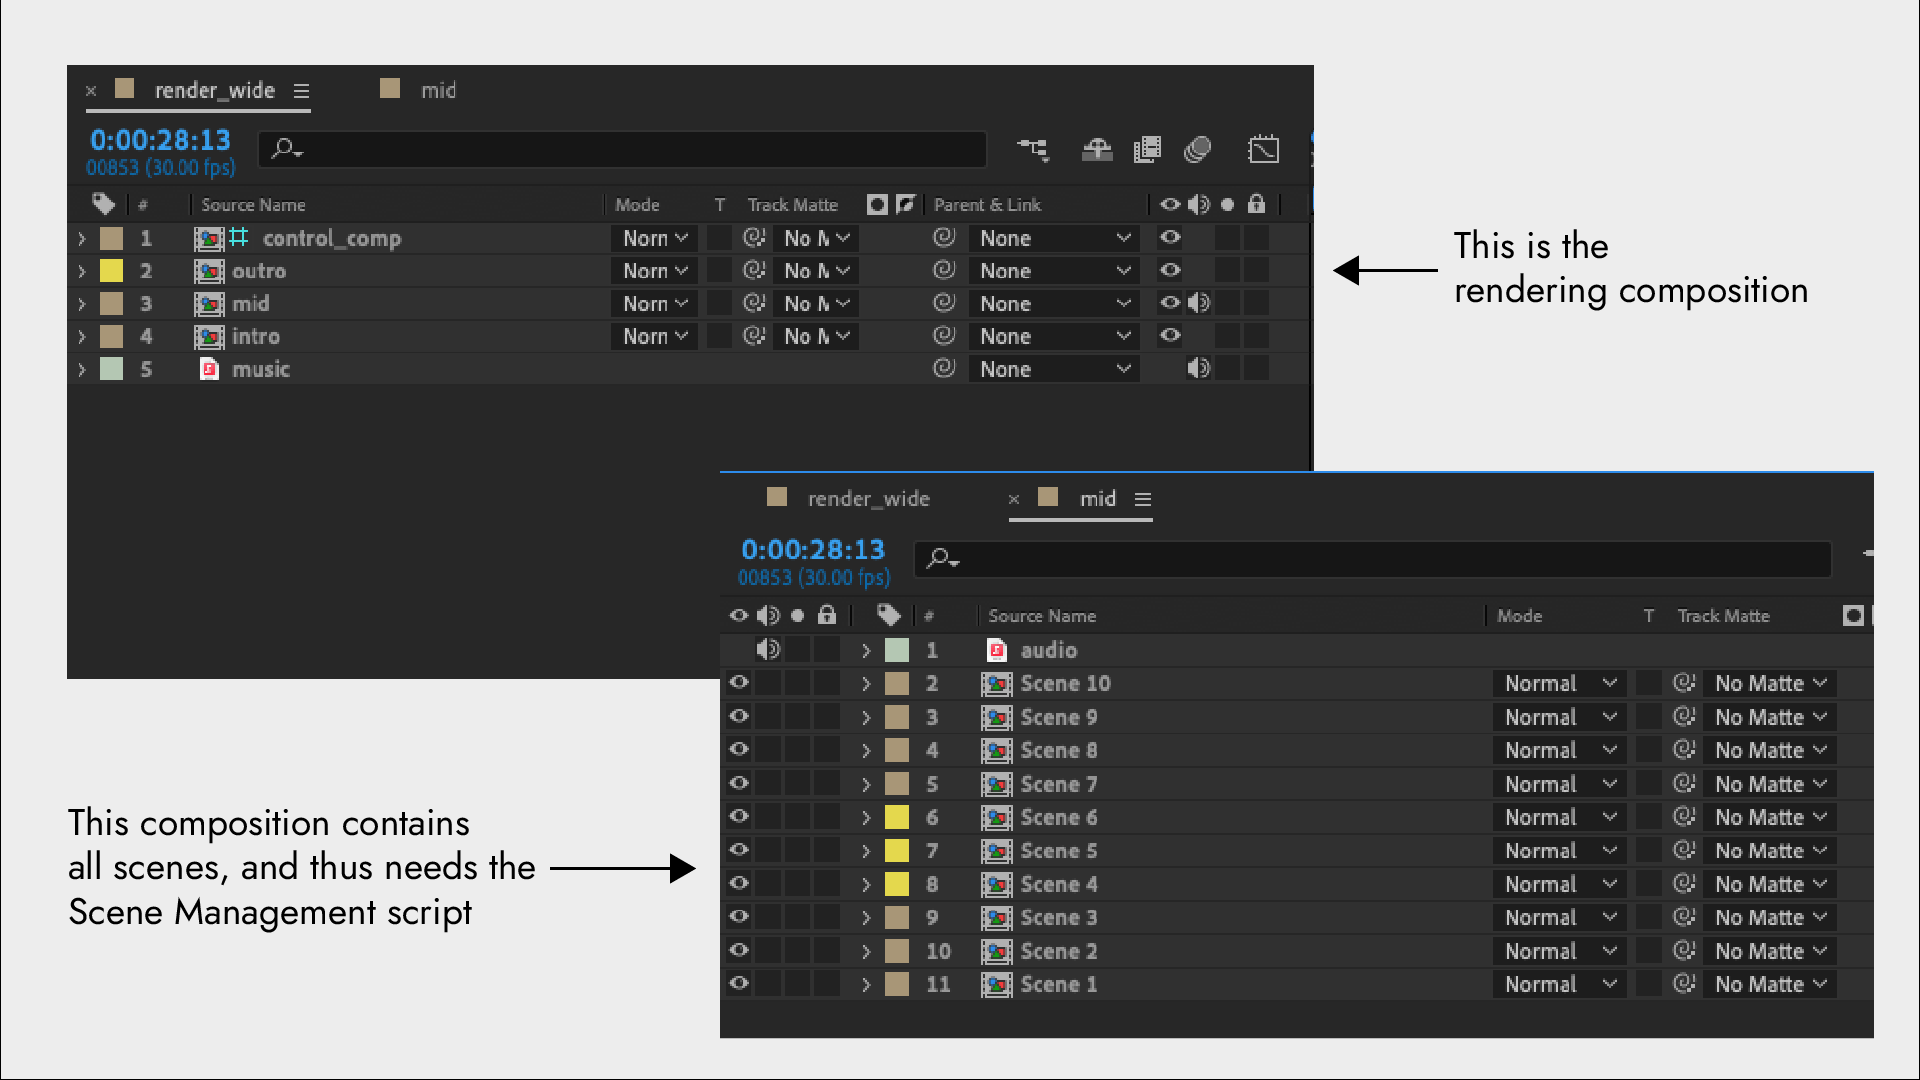
In the example above, this would be the mid composition. You can combine the Scene Management script with other scripts in order to achieve the output you wish. You can see in the example below how we did this using a combination of Scene management, ShiftIn and Crop scripts.
After adding the script to the composition that has all of your scenes, you will be required to set up the following fields:
-
Main asset layer name - this is the layer that contains the
main asset. This basically means the voiceover or the avatar video layer that will drive the length of the video. -
Scene composition prefix - specify what’s the prefix of your Scene compositions. For example, if you name the scenes "Scene 1", "Scene 2", etc. in After Effects, you should write
Scenein this field. -
Max scenes - specify the maximum amount of scenes that this template can have.
-
Scene overlap - specify the overlap (in frames) that your scene compositions have. This ensures that you can animate a nice transition between the scenes.
-
Media composition prefix - similarly to the Scene composition prefix, you need to specify what’s the prefix in the name of your media compositions. If you name your media compositions "Media 1", "Media 2", etc. in After Effects, you should write
Mediain this field. Media compositions are compositions that contain the asset for each scene. -
Scene asset layer name - specify the name of the layer that contains the asset in the scenes. This can be either an image or a video layer.
-
Headline composition prefix - same as Scene composition prefix, or Media composition prefix but for headlines. Specify the prefix in the name of your headline compositions. Headline compositions should contain the headline and the sub-headline layers.
-
Max headlines - specify the max amount of headlines (and sub-headlines) per scene.
-
Heading layer name - specify the name of the headline text layers.
-
Sub-heading layer name - specify the name of the sub-heading text layers.
A few things to keep in mind:
-
Scene, media and asset compositions need to be named the same throughout the template. This is important because if you specify the
Media composition prefixto beMedia, the script can’t find your media compositions if you name one media compMedia 1in the first scene, and thenMedia Secondin the second scene. Keep the naming consistent. -
This is also true for headlines and sub-headlines.
-
Best practice is to create the first scene, and then duplicate it to keep the structure, and then work on the graphic elements, transitions, etc. Make sure that you don’t reuse the compositions, and don’t forget to change the numbers (Media 1, Media 2, Media 3, etc.) depending on the scene.
Scripts ordering
A key thing to point out is that scripts are executed in the order that you set them up in the parameterization step.
For example, sometimes you want to apply the shiftIn before the crop script (just think for a second how would you do this if you were doing it manually, and then apply scripts in the same way). This is really important because not applying them in the correct order can cause unwanted results.
|
A few challenges you might face: 1. Output video does not look good - Check the order in which you applied the scripts, also make sure that you didn’t add too many scripts. One or two scripts is often enough. Failed renders Two failed renders in a row - Make sure that you didn’t add duplicate scripts. 3. The project must contain an .aep file in the ZIP root folder. - This error comes up when you compress the folder, and not the contents of the folder. |
Template editing
If you finish your setup (create templates & parameters), start rendering and notice a mistake you can easily update the template without the creation of a new project. Go to your After Effects project, do your edits and click on the “Edit” button on the project page. This will open the same upload form as you saw during the initial upload. Make sure that you select the right version of After Effects.
It’s important to note that you can’t delete any parametrized layers, or edit their names if you want the edit to work. Once we create the map of the dynamic parameters, we expect to see the same map during the upload of the edited project.
If you delete, change sources, or change the names of parametrized layers make sure that you also edit the template. Delete the parametrized layers that you changed, save the template, and then add them again.
|
A challenge you might face: Failed renders - If you changed any layer names or source files in your After Effects project this will cause failed renders. To fix, delete the parametrization, save the template and add parametrized layers again. Also, double check the version of After Effects and make sure that you correctly marked the version during the reupload. |
After Effects best practices
After Effects templates for custom have no special requirements, you can simply create your template as you would create any video. We do however have best practices that help you get the best output. These best practices involve formatting of text, formatting of images, proper naming structure, and similar.
If you have any questions, feel free to contact us at ae@plainlyvideos.com.
Naming Layers
Custom projects often have a lot of layers. In order to be as efficient as possible during setup, you can put a prefix in the layer when naming layers that should be dynamic. This way you can find them easily in Plainly during the parametrization.
| Make sure that you didn’t add any non-English characters to layer/file names. This will cause failed renders. |
Compositions
To easily find the rendering compositions in the setup process, make sure that you add a prefix (.ie “render_”) to make your life easier.
Text auto-scale
Depending on what type of text are you using in the template (paragraph or point) you can add the following expressions in order to achieve auto scaling. When added, the text will automatically scale based on the input, and a defined bounding box.
Paragraph text
If your templates use big lines of text, you are probably using paragraph text (text that is bounded by an area) and it probably goes into multiple lines. Create an area that the text should fill, and find a reasonable amount of characters that you think will cover all use cases. If you know all use cases that are then the best-case scenario because you can plan and design accordingly.
Your best chances in keeping this controlled are limiting the number of characters that the user inputs. This is not enforced in any way in After Effects, you just need to provide the number of max amount of characters that each layer can take and notify the user.
In order to keep the text centered at all points, apply the following expression to the anchor point of that text layer.
top = sourceRectAtTime().top;
left = sourceRectAtTime().left;
x = left + (sourceRectAtTime().width/2);
y = top + (sourceRectAtTime().height/2);
[x,y]
Point text
If your text is in one line, that means that you’re probably using point text. Point text is very easy to manage, as you can add a simple expression that will automatically scale the size of the text based on the input. Simply create a solid layer named “boundingbox” which will serve as the borders for your text.
If the text goes beyond the borders of this text, it will start scaling down. After you create the solid layer, add the following expression to the scale property of your text layer.
text_width = thisLayer.sourceRectAtTime(time).width;
text_height = thisLayer.sourceRectAtTime(time).height;
rect_height = thisComp.layer("boundingbox").height*thisComp.layer("boundingbox").scale[1]/100-2;
rect_width = thisComp.layer("boundingbox").width*thisComp.layer("boundingbox").scale[0]/100-2;
sTemp = Math.min(rect_width/text_width*100, rect_height/text_height*100);
s = Math.min (100,sTemp);
[s,s]
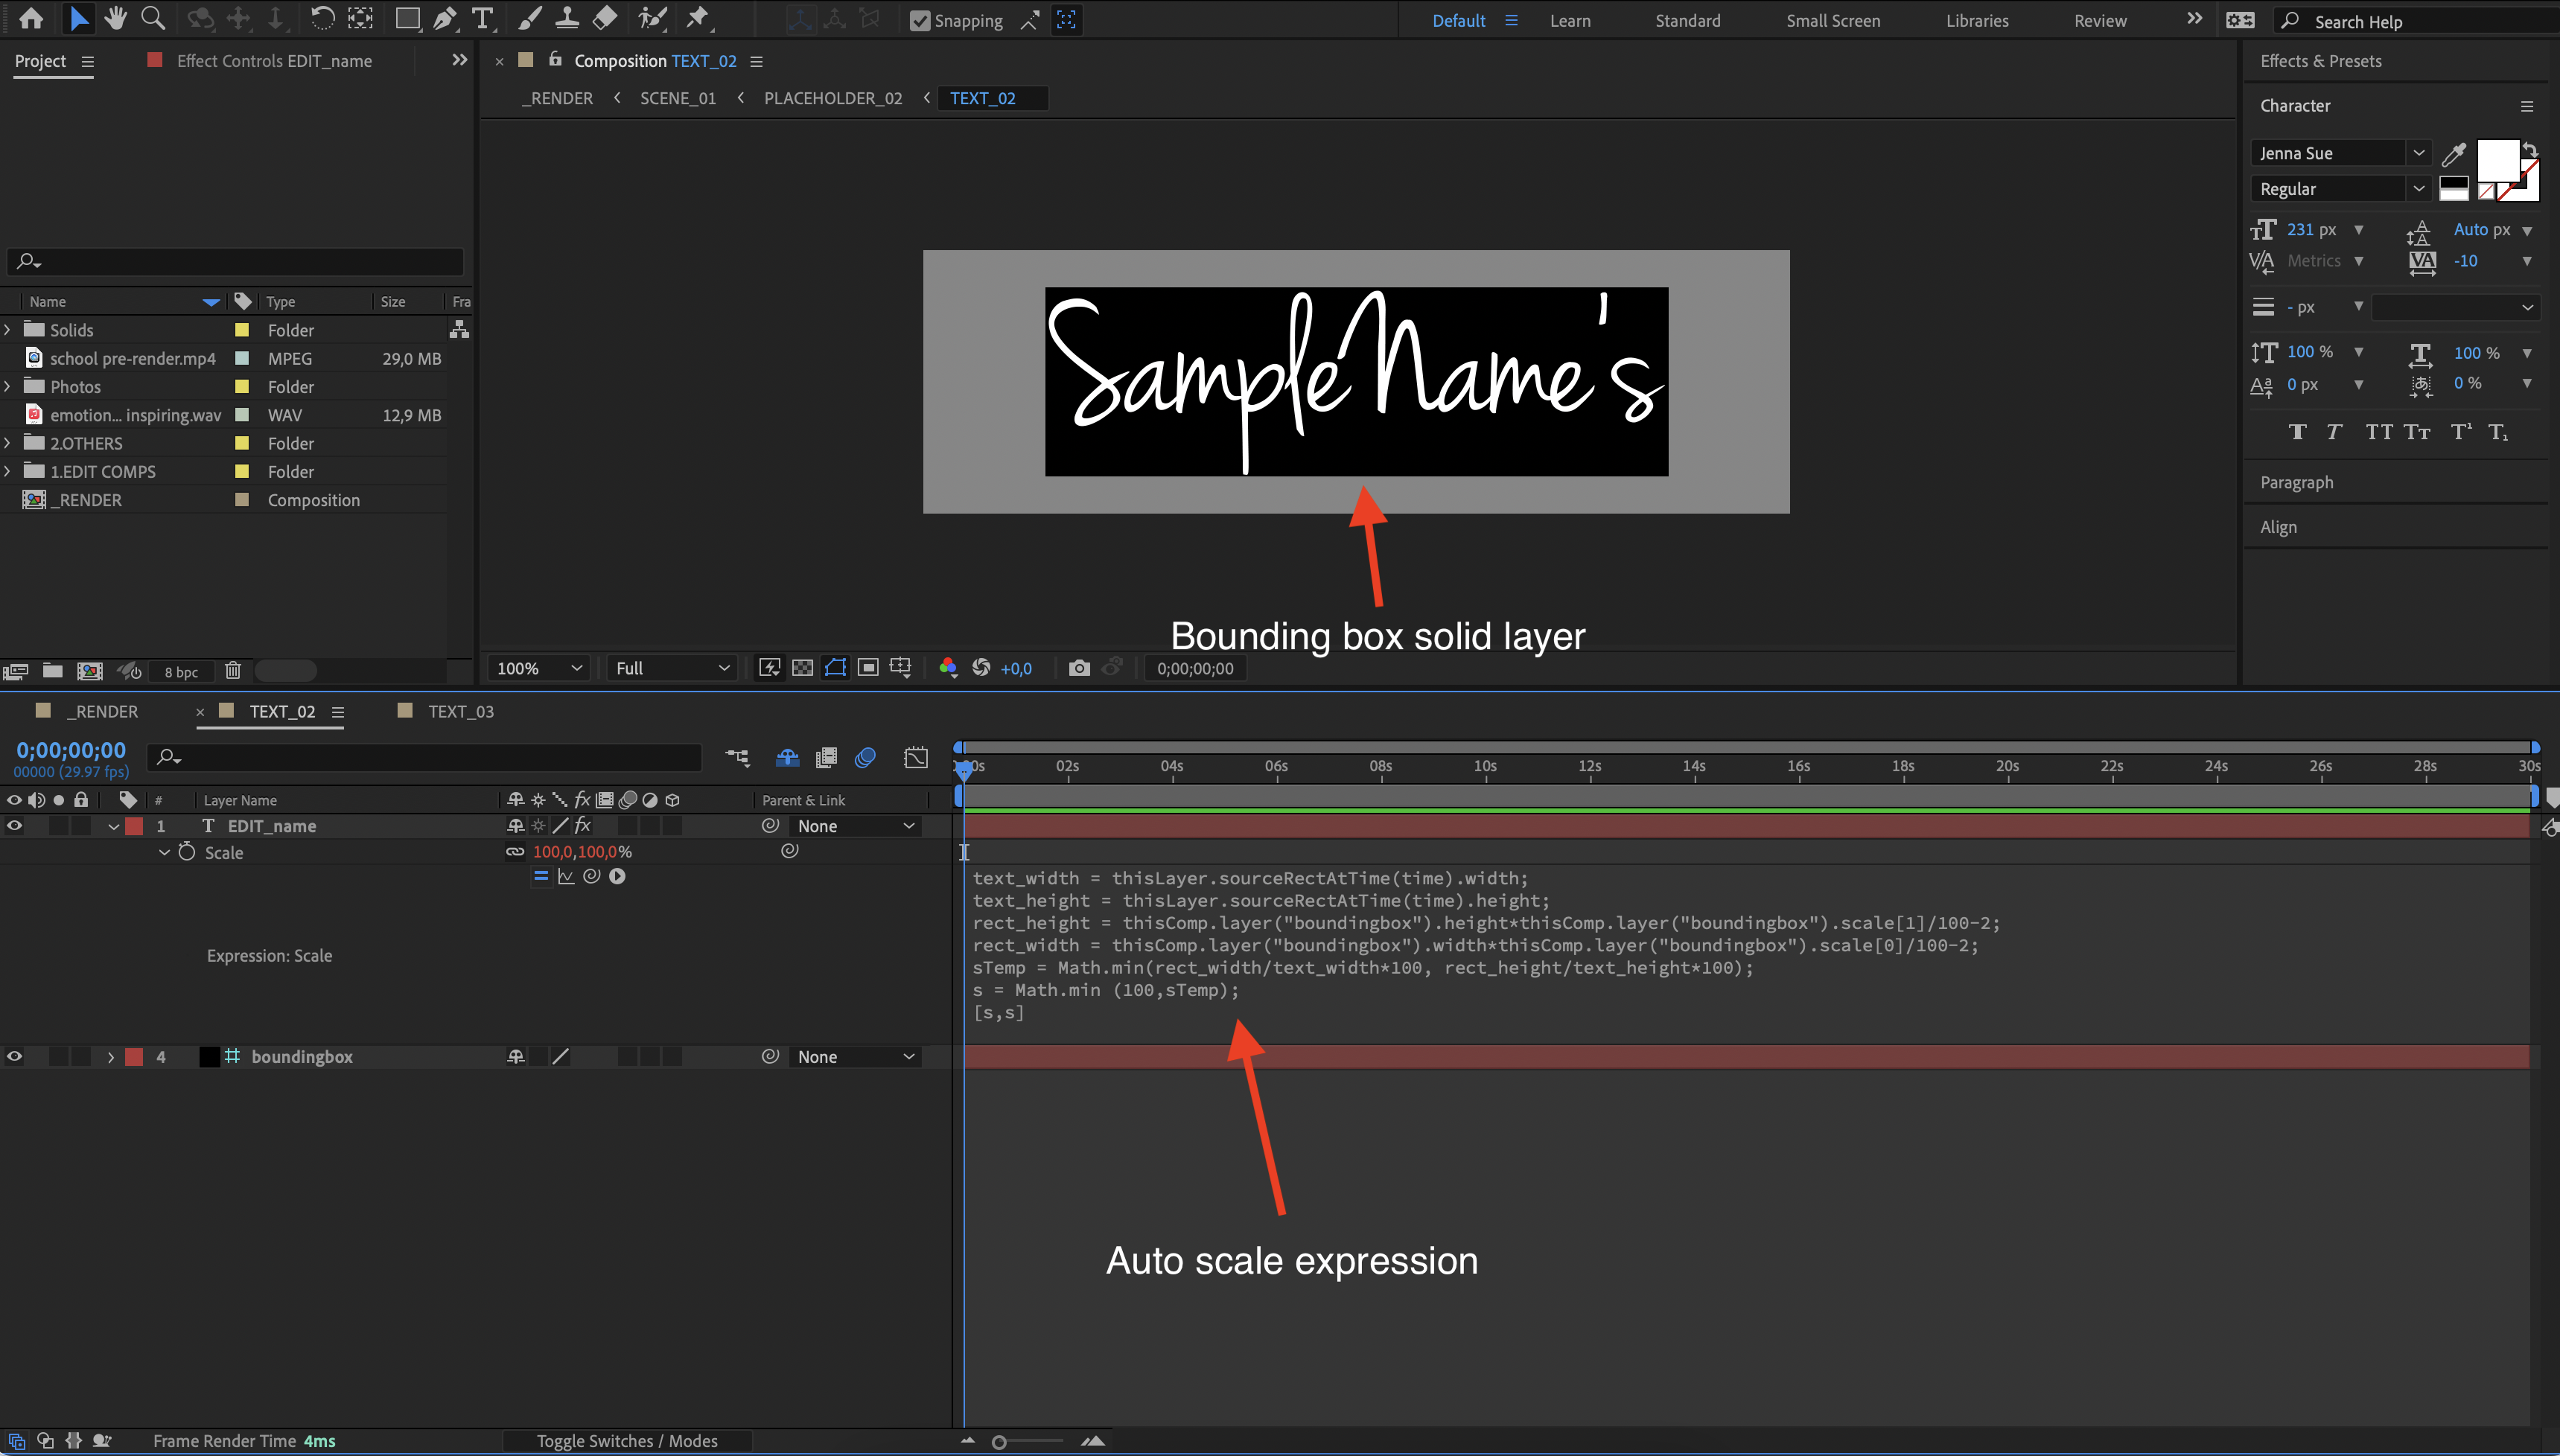
If you have multiple text layers in the same comp that need automatic scaling, make sure to create multiple bounding boxes, and change their names in the expression above.
Text background
If your paragraph text has a colored background and you want the background to scale with text, make sure to apply the following expressions:
To the text anchor point
yPos = thisLayer.sourceRectAtTime(time).height / 2;
[0, yPos]
To the Rectangle Path/Size of the shape that’s serving as the background
subText = thisComp.layer("name_of_our_text_layer");
textWidth = subText.sourceRectAtTime(time).width + 70;
textHeight = subText.sourceRectAtTime(time).height + 70;
[textWidth, textHeight]
70 is the padding - you can adjust it manually.
Images / Videos
One of the biggest issues when creating templates is scaling images and videos. In a perfect world, all images/videos are the same dimensions but this usually is not the case. Luckily you can get auto-scaling assets in After Effects.
First off, all images/videos that are going to be dynamic have to be in their own compositions. These compositions will serve as a “container” for the image/video. Don’t add any effects, keyframes or anything to the image/video inside of the composition, add everything to the composition itself.
The size of the “container” composition should be the maximum size you want the image/video to be.
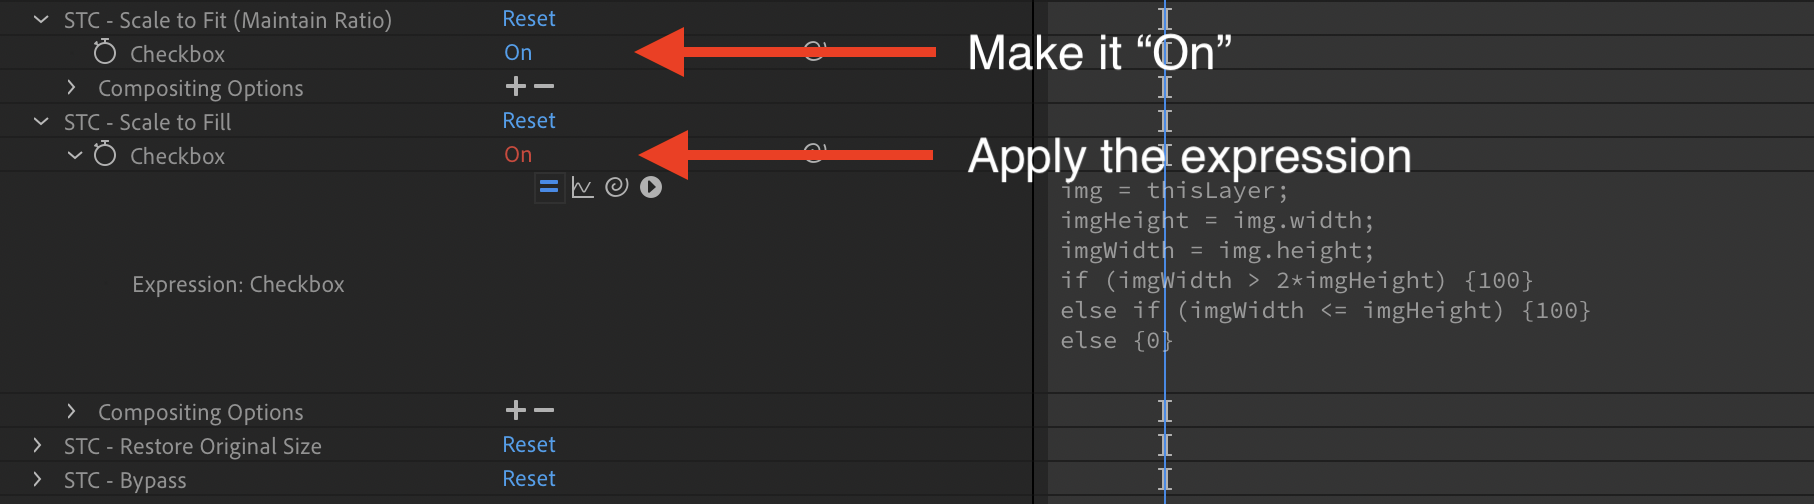
We need to add the Scale to Comp effect on each image/video. This effect will automatically scale the image/video according to its container comp.
Download the image from this link. Install the preset and apply the effect to every dynamic image/video.
When you apply it, you will have a couple of options in your "Effect Controls" panel, make sure to check the first box, and apply an expression to the second checkbox:
If Composition is Vertical:
img = thisLayer;
imgHeight = img.width;
imgWidth = img.height;
if (imgWidth > 2*imgHeight) {100}
else if (imgWidth <= imgHeight) {100}
else {0}
If Composition is Horizontal:
img = thisLayer;
imgWidth = img.width;
imgHeight = img.height;
if (imgWidth > 2*imgHeight) {100}
else if (imgWidth <= imgHeight) {100}
else {0}
| If Composition is square: Just check first 2 boxes (fit and fill), there’s no need for any expression. |
Color control
If you want to dynamically swap a color of a solid layer, we support that out of the box. Just upload your project, make your solid dynamic and you will be able to control its colors.
If you want to dynamically swap out colors of other layers (such as shape, text or similar) you will have to set up a color-control layer. This is a text layer in After Effects that will hill hold the HEX value of the color.
Start by adding a new text layer, and type in the hex code of the color (without the #). Then, go to the layer which you will re-color and add the following expression to its color property:
function hexToColor(theHex) {
    var r = theHex >> 16;
    var g = (theHex & 0x00ff00) >> 8;
    var b = theHex & 0xff;
    return [r/255,g/255,b/255,1]
}
hexToColor("0x" +comp("control_comp").layer("color_primary").text.sourceText);
Make sure that you reference the right comp and the right layer! You can have as many dynamic colors as you wish, just make sure to create a text layer for each color.
If the layer you want to re-color doesn’t have a color property, you can add a fill effect and then apply the expression to the color property of that fill effect.
Optimizing the After Effects project
-
Pre-render as much as possible - pre-rendering is the most useful technique for lowering render times. Make sure to pre-render all layers that are using effects, or that are slowing down the preview in After Effects. Also, pre-rendering image sequences will make sure that your project can be under our upload limit. Simply isolate the layers you want to pre-render one by one, and render them out as an mp4. If you have layers with transparency, add a green screen as a background, and key out that green screen in the template.
For example: If you use any of Trapcode plugins; pre-compose it; render that composition as a .mp4 sequence and turn off the original layer. You just pre-rendered a composition.
This is a huge boost to your render times because AE doesn’t have to calculate heavy layers with complex effects or plugins on it, it just plays a .mp4 video. -
Use as few effects and plugins as possible - Effects destroy render times. If speed is important to you, try lowering the amount of the effects/plugins to a minimum, or if it’s possible don’t use them at all.
-
Use as few expressions as possible - Expressions are also a killer for render times. Especially very complex expressions. After Effects needs to calculate the expression you set every frame, and if it’s a big one you bet it will slow down your renders.
-
Resize all of the assets in the comp - If you use large assets, they will also affect the render time. Try cropping all of the assets in your composition to the right dimensions, instead of using a 4k image or video in a 720p composition.
-
Cut down resolution if you don’t need it - If you are posting to social media, there is no need to use 2k or 4k videos. Research the best dimensions for videos and cut down the resolution if you see that your videos are too big.
-
Optimize your pre-comps - Before finalizing your project, check all pre-comps just to make sure that you don’t have unnecessary files in there. It’s very easy to overlook objects off-screen which will increase your render times. Check everything, clean up, and optimize.
Static link sharing
Only available on certain Plainly subscription plans.
Sharing links enable you to have static, non-changeable, links for videos rendered in your projects. Since every video rendered has it’s own unique link where it can be downloaded, this feature enables you to have a single link for each project and template. Sharing can operate in two modes:
-
Automatic latest promotion - this mode will always promote the latest successfully rendered video for the given template to the shared link automatically.
-
Manual promotion - you explicitly select videos you want to promote to the shared link.
You can enable sharing by clicking on the Enable sharing button in the project details page.
Sharing can be enabled only for the complete project and will affect all templates.
The sharing link for each template can be found in the template details page.
Please not that sharing links will become nonfunctional if:
-
Sharing is disabled for a project, or a project is deleted
-
A template is deleted (only affects a link for that single template)
Sharing is currently only supported for the .mp4 video format.
|
Rendering
Rendering is a process of sending data to Plainly and exporting a new instance of a template you set up. There are a few ways you can do this.
Single render
If you want to quickly render out a single video, you can do that through the rendering form in our app. Simply go to the template you want to render, click on the “Render” button in the top right and fill out the parameter fields.
Once you fill out the parameters, and click render that will send one render request to Plainly, and your render will appear in the “Renders” tab (which you can access from the sidebar).
Batch render
If you want to send a batch of requests to Plainly, but don’t want to use our API you can do this with the batch render. All you have to do is create a CSV with all variations you want to render. Create one column for one parameter, and each row will be a new render.
Once again, go to the render form, and click on the “Batch render” button on the top. Upload your CSV, map columns to parameters, and click render. This will instantly send a request for as many renders as you have rows.
Tweet To Video
We call tweet-to-video a mini-app. These mini-apps are a collection automations that we created in order to help you get one-click automatic rendering. To use tweet-to-video simply go to the “Designs” tab, find a Twitter template, click render and paste the URL to your tweet.
Plainly will take the data it needs from that tweet, add it into the template and render a video.
API
Plainly’s API is how you can get the most out of our tool. It’s a powerful API that allows rendering of huge volumes. You can do that with batch rendering, but with the API you have the ability to create even more robust workflows.
Almost all actions you do within our web app can be done through the API. This means that you can set up templates, get render info, and of course render videos through the API.
It’s an easy-to-use Rest API and you can see the documentation on this link.
Asset handling
Any assets you’re sending to Plainly have to be stored on the cloud, and during the rendering you will be providing a link to that asset. This link has to be public, or signed and if you are not sure if it’s going to work, the easiest way to check is to open the single render form and paste the link in a parameter field.
Plainly will do the asset validation process, and if this is a valid link it wil tell you.
If you create renders with the render form, you can also use our native file upload system. This will allow you to upload files from the local machine, but this system is not available with the API or batch rendering.
We can take Google Drive and Dropbox links but only if you are providing us with the right link. You can get these links by using the Google Drive or Dropbox APIs, just pasting a link that you see in the browser won’t work.
Advanced rendering options
Advanced rendering options are accessed through the top right button in the render form. These options allow you to set up different output formats, add a webhook, export thumbnails or add a watermark.
Render formats
We support multiple rendering formats such as MP4, GIF or MOV. Keep in mind that changing the rendering format might cause longer render times or unwanted render results. MP4 is the safest rendering format, and it will produce the best results.
You can also play with the encoding parameters. We use FFmpeg for the video encoding, and if you are an advanced user that wants to play around with this you can simply add the parameters that you want to use. This will also affect render times and output results.
Webhook
If you want to get notified when the render is done, you can set up a webhook notification. Webhook is a URL that you can pass to Plainly when invoking a render, and once the render is done we will send a POST request to that URL with the result of the render process.
When passing the webhook information, beside the URL you can include additional properties and options:
-
url- The HTTP(S) webhook URL to execute the POST call once the rendering is finished. -
passthrough- Pass through value for the webhook. -
onFailure- Should webhook be called also on the failed renders. -
onInvalid- Should webhook be called also on the invalid renders.
If onInvalid parameter is null or unset, the value of the onFailure parameter will be used instead in order to decide if the webhook should be called on the invalid renders.
|
Webhook delivery
The delivery on the provided webhook URL will be done automatically in the following fashion:
-
A webhook HTTP(S) call expects a
2xxstatus code in order to be marked as successful. -
In case of a failed delivery, Plainly will attempt to re-call your webhook for up to one day in space of 15 minutes.
-
A webhook HTTP(S) request has a timeout of 30 seconds.
-
A webhook HTTP(S) request does follow redirects.
Once the rendering state is finalized successfully, a POST HTTP request will be sent to webhook URL containing the following body:
{
  "renderingId": "e1b6334e-53aa-4ac4-a08b-7975e7ce7249",
  "projectId": "56a25886-ede2-4cfc-83be-d40dd60802e8",
  "success": true,
  "output": "https://example.com/output-url.mp4",
  "outputWatermark": "https://example.com/output-watermark-url.mp4",
  "thumbnailUris": ["https://example.com/thumbnail1.png"],
  "passthrough": "This is a pass through value",
  "error": null,
  "projectName": "Project name",
  "templateName": "Template name",
  "expirationDate": "2024-12-31T23:59:59Z",
  "outputFormat": "MP4"
}
If webhook options allow the delivery in case of a failed or invalid renders, the payload sent will be slightly different, as it will not contain the output information and error property will contain the error details:
{
  "renderingId": "e1b6334e-53aa-4ac4-a08b-7975e7ce7249",
  "projectId": "56a25886-ede2-4cfc-83be-d40dd60802e8",
  "success": false,
  "output": null,
  "outputWatermark": null,
  "thumbnailUris": [],
  "passthrough": "This is a pass through value",
  "error": {
    "message": "An error occurred during rendering",
    "code": "RENDER_ERROR"
  },
  "projectName": "Project name",
  "templateName": "Template name",
  "expirationDate": null,
  "outputFormat": "MP4"
}
Thumbnails export
If you enable this option, Plainly will not only export the video but also thumbnails which you can use as a poster on social media. All you have to do is specify the frequency at which you want to get thumbnails and Plainly will provide them alongside the final video to you.
Watermark
You can pass a link to an image or video, that you want to use as a watermark, or upload it directly from your local machine. You can also pass encoding parameters for the watermark. Having encoding params allows for the control of how watermark is added. If not passed, the watermark will be placed in the top left corner of the video.
Here are some examples of encoding parameters that you can use for the watermark:
Top left
-filter_complex [1]scale=iw*0.2:-1,format=rgba,colorchannelmixer=aa=0.8[watermark];[0][watermark]overlay=10:10[out] -map [out]Top right
-filter_complex [1]scale=iw*0.2:-1,format=rgba,colorchannelmixer=aa=0.8[watermark];[0][watermark]overlay=W-w-10:10[out] -map [out]Bottom left
-filter_complex [1]scale=iw*0.2:-1,format=rgba,colorchannelmixer=aa=0.8[watermark];[0][watermark]overlay=10:H-h-10[out] -map [out]Bottom right
-filter_complex [1]scale=iw*0.2:-1,format=rgba,colorchannelmixer=aa=0.8[watermark];[0][watermark]overlay=W-w-10:H-h-10[out] -map [out]Center
-filter_complex [1]scale=iw*0.2:-1,format=rgba,colorchannelmixer=aa=0.8[watermark];[0][watermark]overlay=(W-w)/2:(H-h)/2[out] -map [out]As you’ve noticed, we are using multiple filters here:
-
overlay- used for positioning the watermark on the video. -
scale- used for scaling the watermark to the desired size. -
format- used for setting the format of the watermark to rgba. -
colorchannelmixer- used for setting the transparency of the watermark.
You can read more about the filters and other possibilities at the FFmpeg documentation.
| If watermark is enabled, we will render two videos, one with the watermark and one without it. |
Re-render
If you get a failed render, which can happen for a lot of reasons we provided you with a simple and quick way to re-render the video, without sending the data again.
You can either render again or re-submit a render through our web app. The render again option will just reuse the same values for parameters…re-submitting a render will reuse the parameters, webhook and advanced rendering options.
You can also resubmit the render using our API, check the relevant docs here.
Integrations
Integrations is a feature that allows you to connect Plainly to your favorite tools in just a few clicks. These integrations require no coding, and you can effortlessly enable sending videos to Google Drive and similar, or trigger rendering from Google Sheets for example.
Integrations can be created on a per-project or a per-template basis. If you create an integration for a specific project, then it will be triggered whenever you render any of the templates inside of that project. If you enable it for a specific template, it will be triggered only when you render that specific template.
| You can have multiple integrations set up for the same template/project. You can even have multiple integrations of the same kind set up. |
Setting up integrations
You can navigate to the integration setup page in two ways. Either by clicking on Integrations item in the sidebar, or from project and template pages.
The first thing you need to do on the Integrations page is to select your project and template. If you navigated to the integrations page from a project or template page this will be automatically selected.
With a project and template selected, you will see all available integrations that can be activated.
In order to set them up, click on a card and fill out the fields in the setup window. Every integration is different, and we will specify each field in the section below. However, usually you’ll have to connect a target tool account first, and then set up the specifics of the integration.
Types of integrations
There are two types of integrations currently:
-
Render triggers - these integrations are initiating renders, for example
Render from custom formorRender from Google Sheet. -
Video distribution - these integrations are distributing the videos automatically after they are created, for example
Upload to YouTubeorUpload to Google Drive.
Activating integrations
Once you set up an integration it is activated immediately and will stay active until you disable or delete it. All active integrations can be see in the Active integrations tab, or in a specific project or template page.
In the case of Video distribution integrations, they will automatically trigger whenever you render a video that uses a template with an enabled integration.
In the case of Render triggers, as soon as you enable the integration you will be able to render videos using that trigger. No extra actions are required.
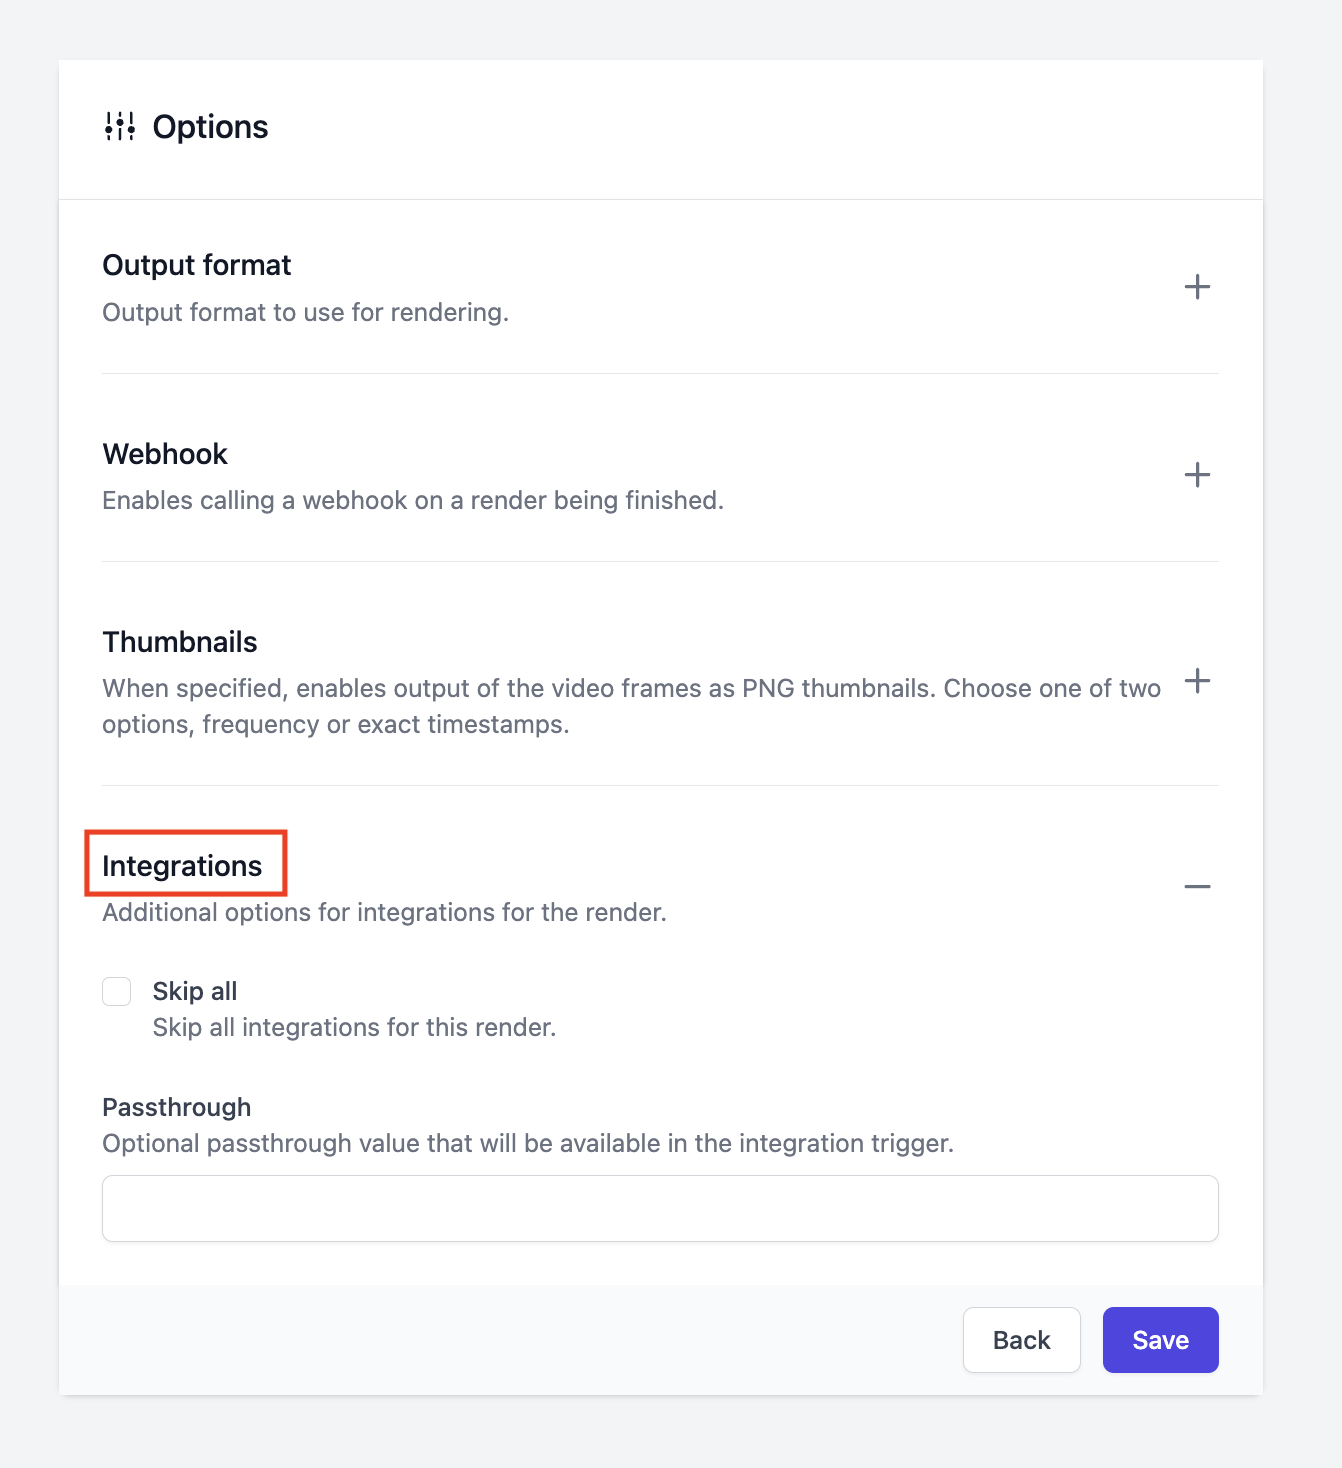
It doesn’t matter what render method are you using (API, Web App, CSV), the distribution integrations are still automatically triggered. However, if you wish to skip integrations once the video is ready, set the field Skip integrations to true in the rendering options.
|
Available integrations
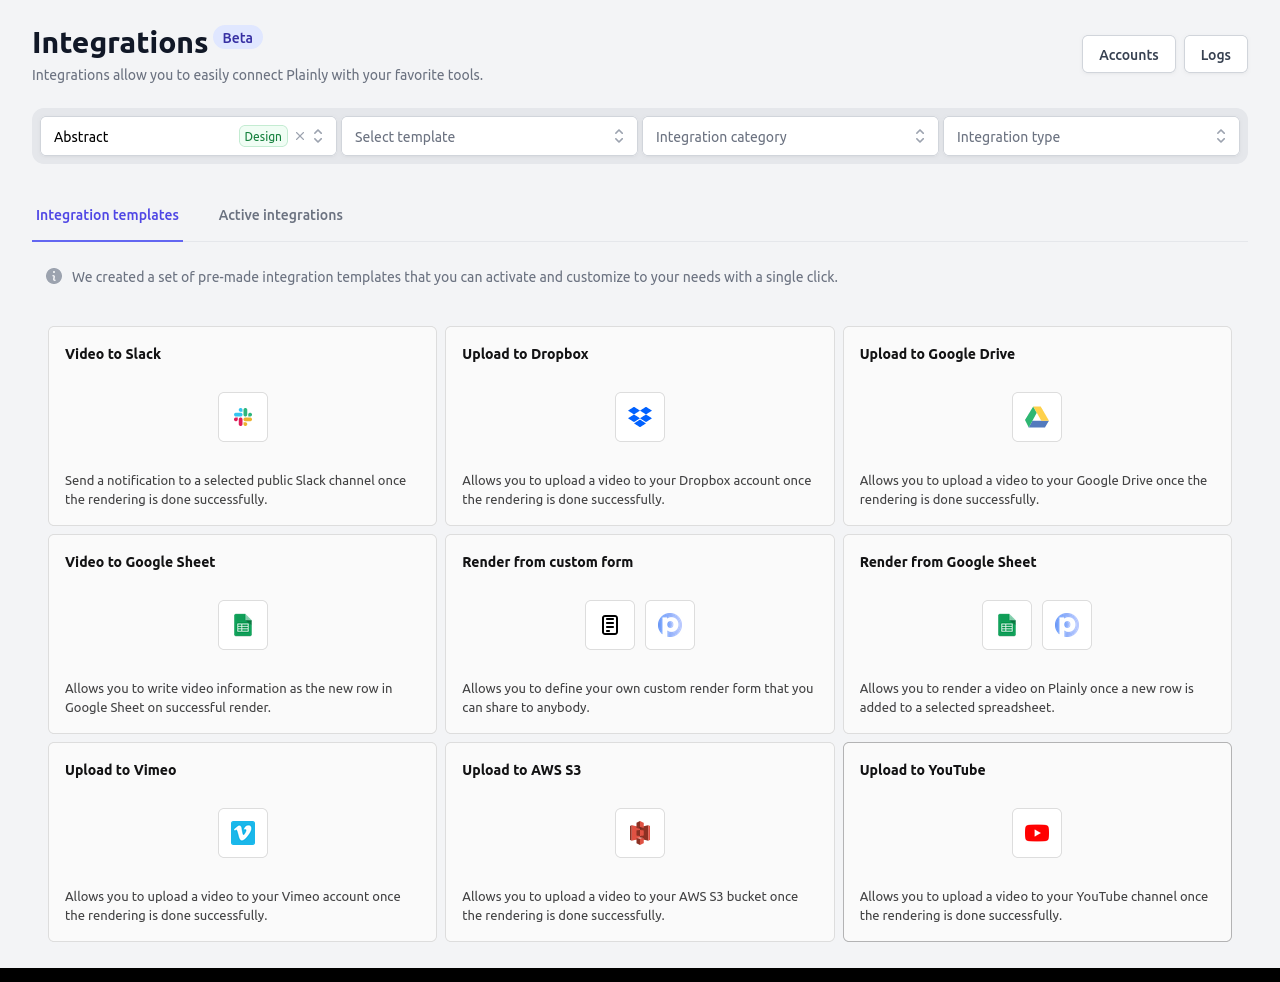
Here are currently available integrations, divided into categories.
| Keep in mind that we add new integrations weekly and the list below might be slightly outdated. In order to find out what integrations we have either sign up, or contact us at contact@plainlyvideos.com. |
Video distribution
Video to Slack
This integration will send the video link to a specified Slack channel. The available fields are:
-
Slack account - link the Slack account you want to use.
-
Channel - select the channel to which you want to send the videos.
-
Message - customize the message that will be used. In this field you can set up dynamic values to be used such as
Project Name, or parameters from the render request.
Upload to Dropbox
This integration will send the video file to a specified Dropbox folder. The available fields are:
-
Dropbox account - link the Dropbox account you want to use.
-
File name - by default, the file name will be
renderID.mp4but you can customize this, and use the parameters from the render request or other parameters such asProject Nameor similar. If you want to use an parameter from the render request as a file name, you will need to use Integration Passthrough. Read about this in the section below. -
File path - specify the location where you want to upload the file.
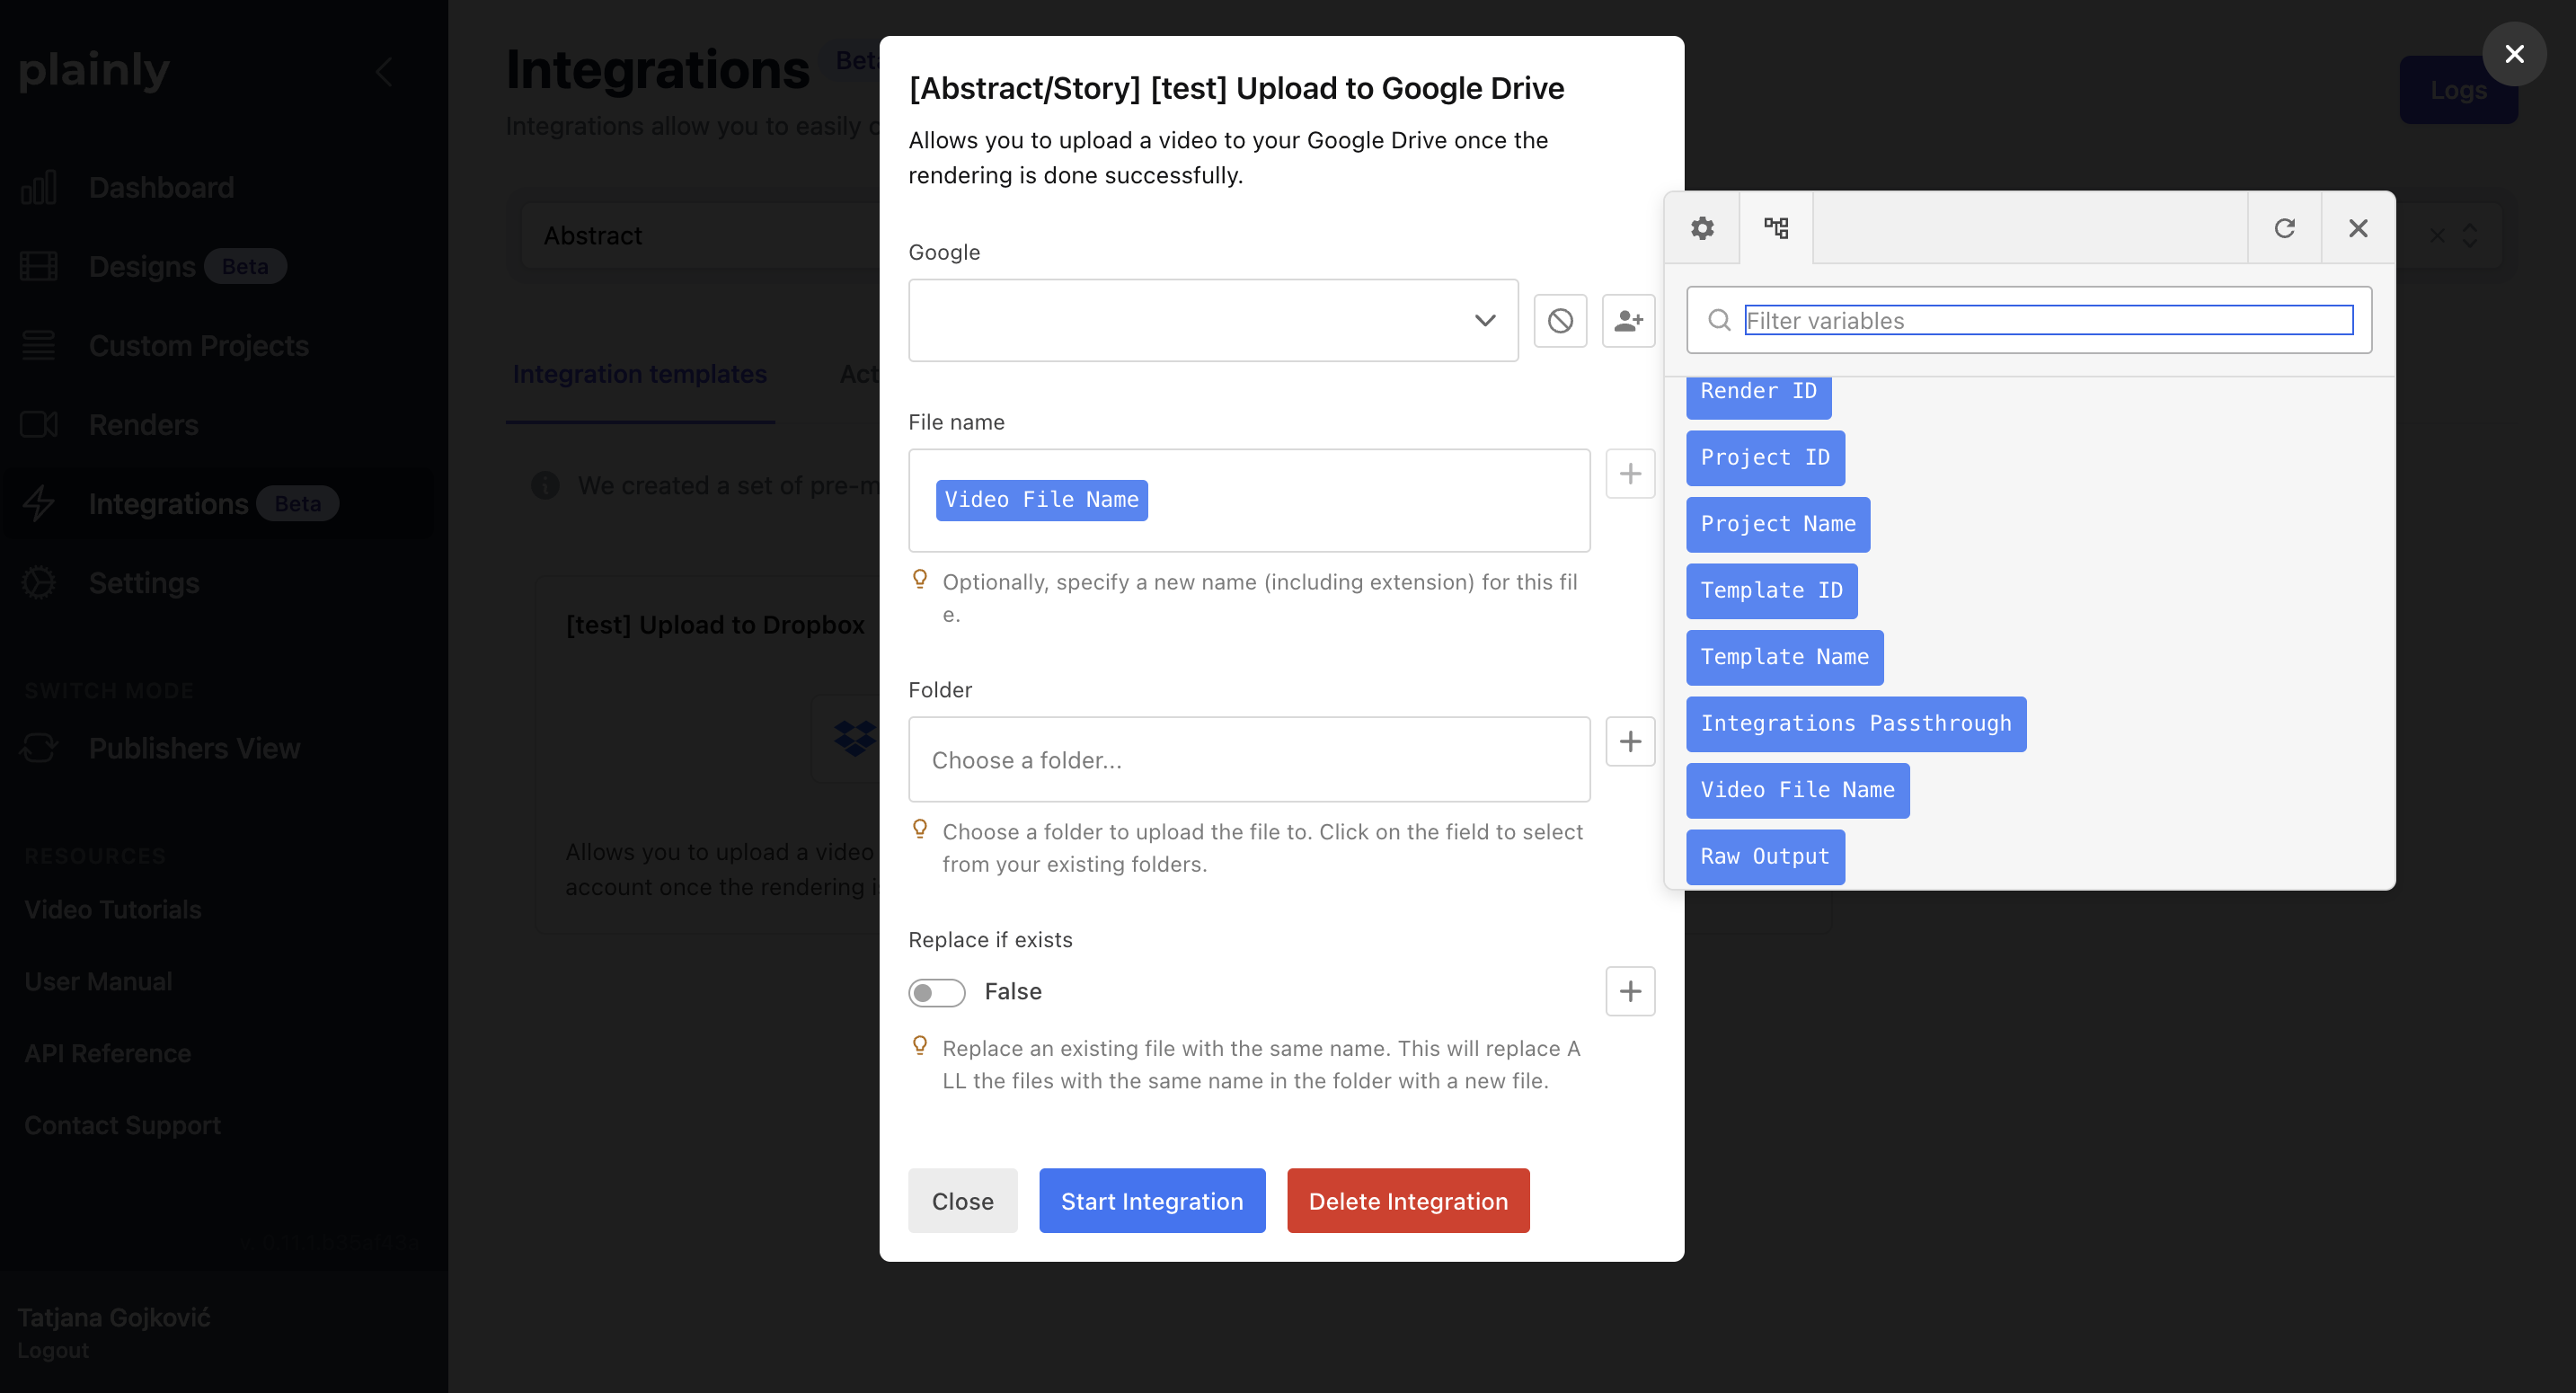
Upload to Google Drive
This integration will send the video file to a specified Google Drive folder. The available fields are:
-
Google account - link the Google account you want to use.
-
File name - by default, the file name will be
renderID.mp4but you can customize this, and use the parameters from the render request or other parameters such asProject Nameor similar. If you want to use an parameter from the render request as a file name, you will need to use Integration Passthrough. Read about this in the section below. -
Folder - specify the folder you want to use.
-
Replace if exists - when enabled, this will replace the file if it exists in the specified folder
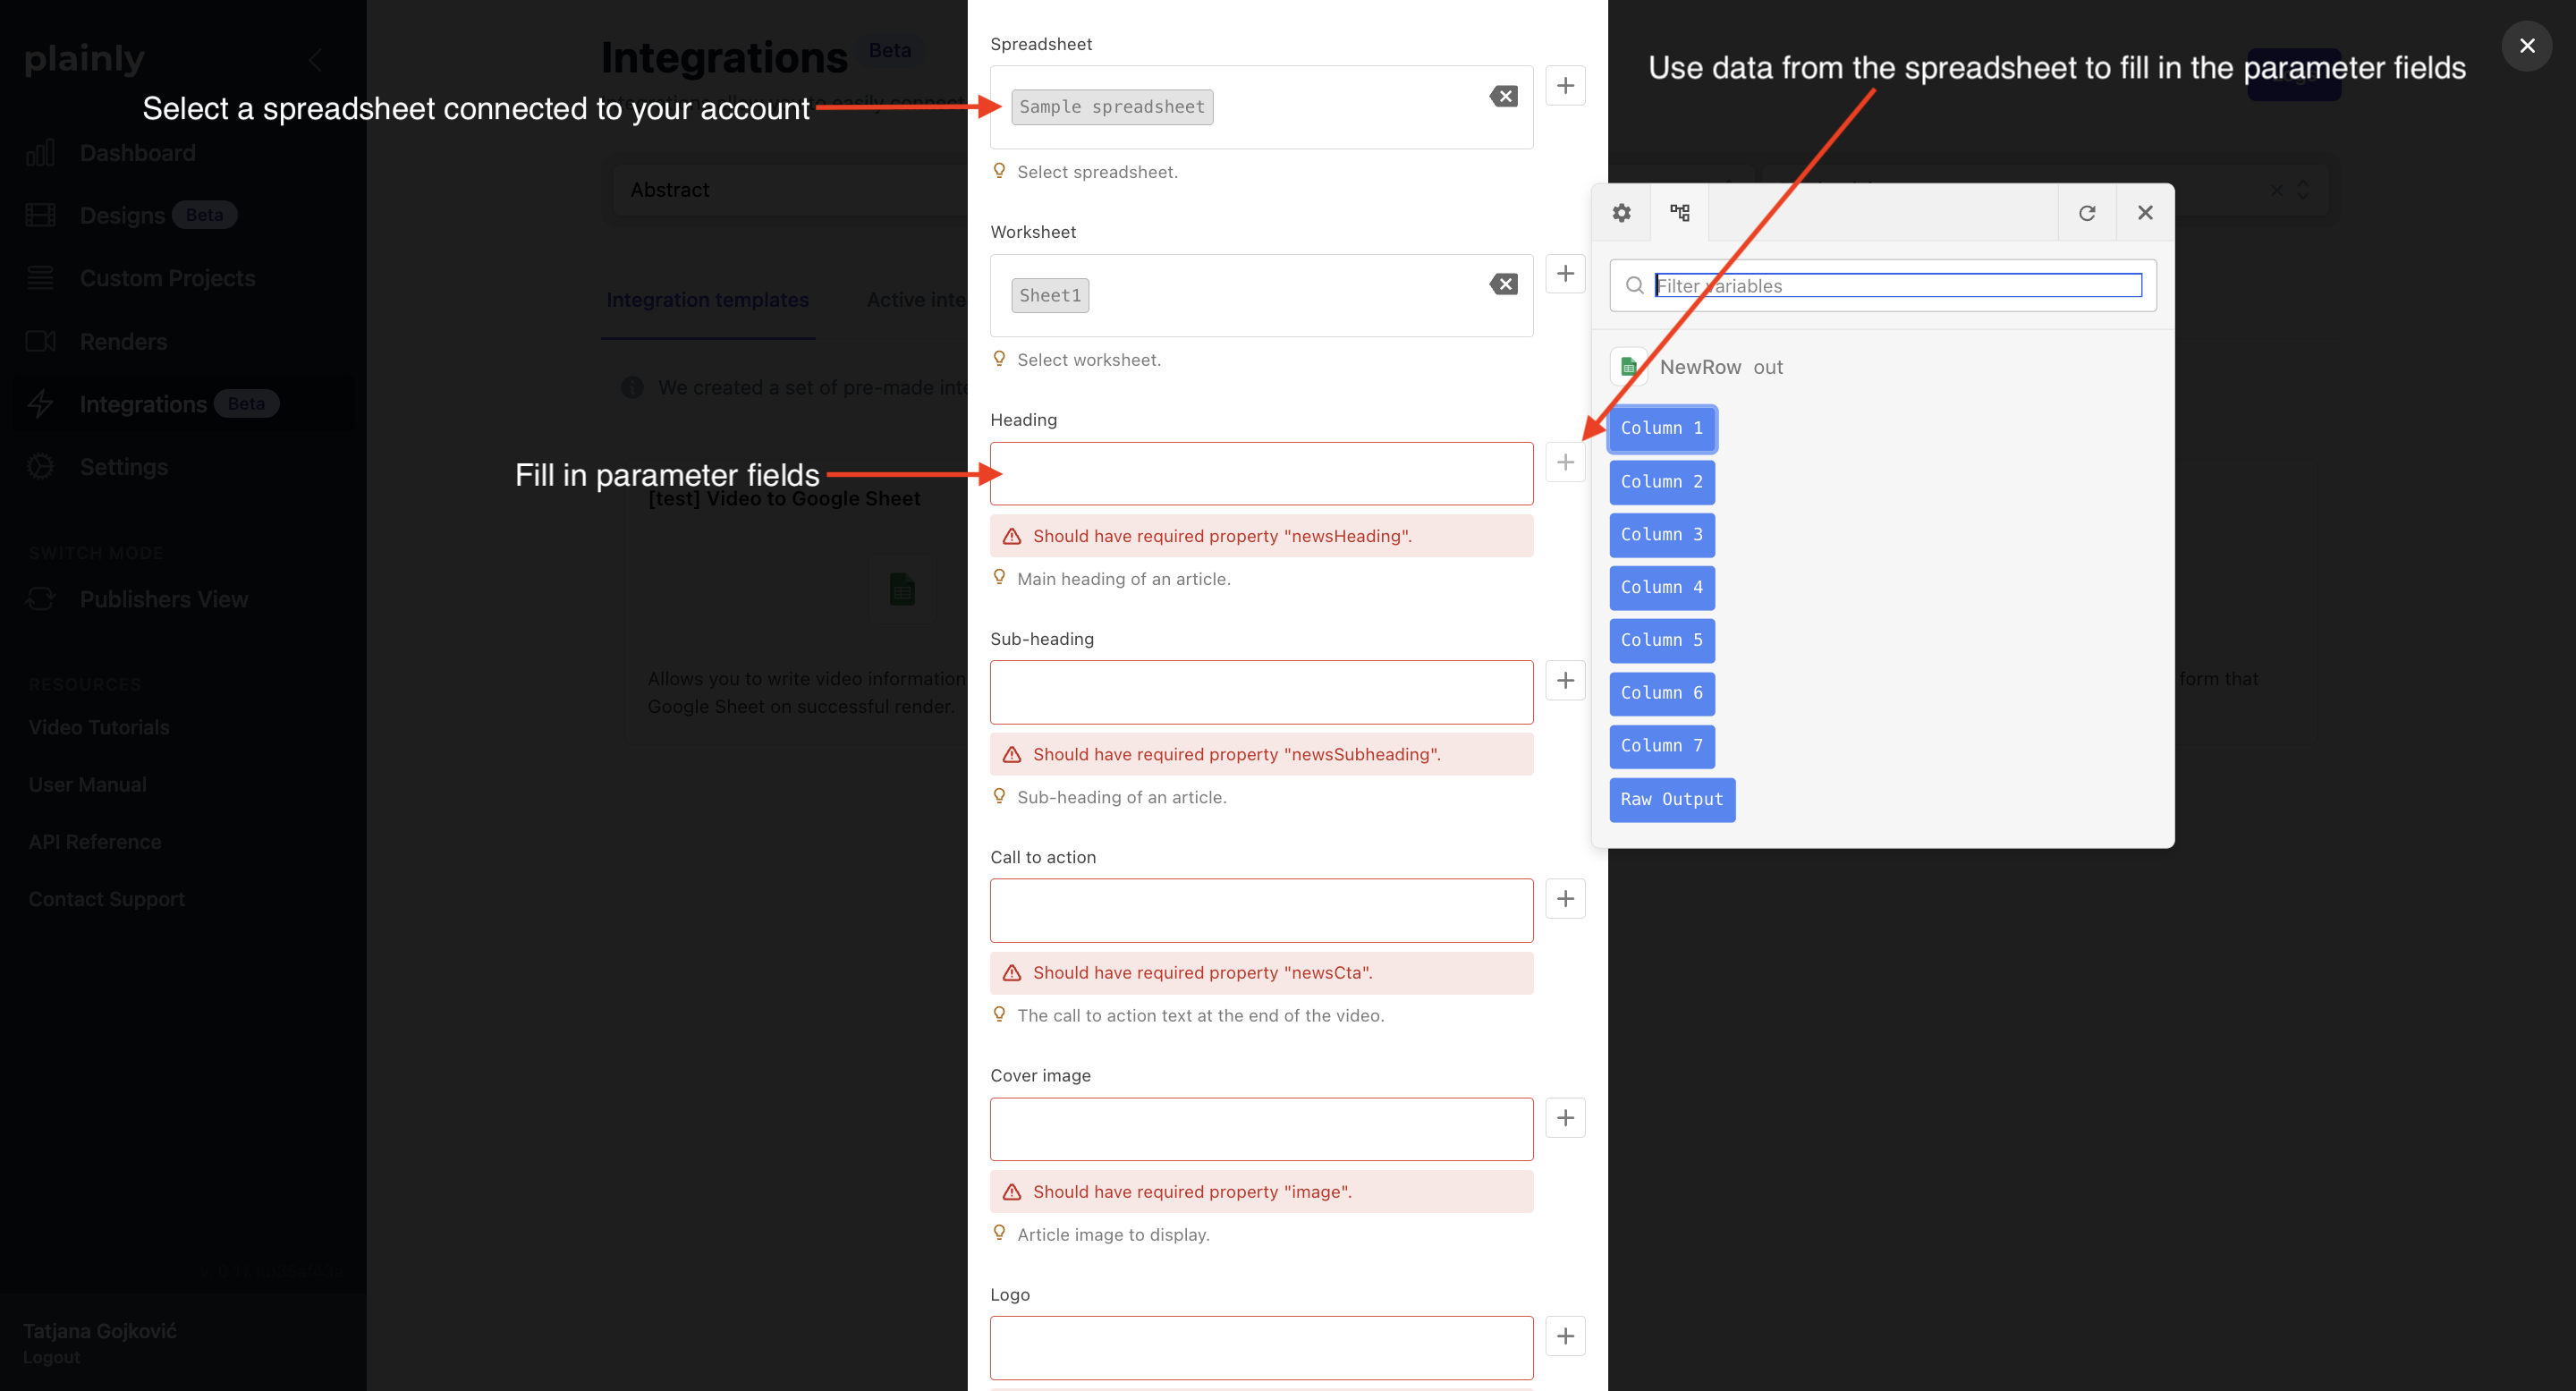
Video to Google Sheet
This integration will add the video link to a specified Google Sheet. The available fields are:
-
Google Account - link the Google Account you want to use.
-
Spreadsheet - select which spreadsheet you want to use.
-
Worksheet - select the sheet you want to use.
Once you select the spreadsheet and the worksheet, Plainly will read you spreadsheet and expose all available columns below the Worksheet field.
Simply map which parameters you want to put in which cell by clicking on the field and then selecting the parameter from the + button on the right.
Upload to Vimeo
This integration will upload the video to your Vimeo channel. The available fields are:
-
Vimeo account - link the Vimeo account you want to use.
-
Name - define what will be the name of the uploaded video. You can use integration passthrough here if you want to send parameters from the render request. Read how to set this up in the section below.
-
Description - define what will be description of the video.
-
Language - define the language of the video.
-
Content rating - define the content rating of the video.
-
License - define the Creative Commons licence.
-
Allow download - if enabled, the viewers will be able to download the video.
-
Embeddable - define where you want to allow the video to be embedded.
-
Privacy settings - define who will be able to view your video.
-
Comments - define who can comment on the video.
Upload to AWS S3
This integration will send the video file to a S3 bucket. The available fields are:
-
AWS account - link the AWS account you want to use.
-
Region - define your AWS instance region,
us-east-1is used as default if this is not defined. -
Bucket - select your AWS bucket.
-
Object key - define the key of the object.
-
Access control - define the ACL applied to the object.
-
Expiry date - set up your expiry date.
Upload to YouTube
This integration upload the video to your YouTube channel. The available fields are:
-
Google account - link the Google account you want to use.
-
Title - define the title of the video. If you want to use parameters from the render request use integration passthrough. Read how to set this up in the section below.
-
Description - define the description of the video.
-
Category - select the category of your video.
-
Tags - set up the tags for the video.
-
Default language - select the language of the video.
-
Publish at - if you want, specify the date in future at which the video will become public.
-
Privacy status - select the privacy status of your video on upload.
-
Licence - set up the licence of the video.
-
Embeddable - when enabled, viewers will be able to embed this video to 3rd party websites.
-
Notify subscribers - when enabled, your subscribers will get a notification on upload of the video (each video that’s uploaded using this integration).
-
Public stats viewable - when enabled, the viewers will see the stats of the video.
-
Self declare made for kids - when enabled, this video will be labeled as
This video is for kids. This can imply additional checks/restrictions by YouTube.
Render triggers
Render from custom form
This integration enables you to set up an external form (similar to Google Forms) that will trigger rendering when filled out. The available fields are:
Form setup
-
Form URL - this is the public URL through which anyone can access the form. Keep in mind that anyone can render videos using this form as long as the integration is enabled. Be careful with sharing.
-
Form title - define the name of the form.
-
Form description - define the description of the form.
-
Form fields - define fields of the form. Usually, you need to link the fields of the form with the parameters of the template. To add new fields simply click on the
Addbutton on the bottom of that section. You will need to define the following parameters for each field:Label,Description,Type,Default Value, andIndex. To link form fields with parameters, scroll down and for each parameter of the template you can use a form field from the+menu on the right. -
Call to action - define what will be a form call to action.
-
Thanks message - define what will be the message shown to the user after submitting the form.
-
Thanks image URL - optionally add an image that will be displayed after submitting the form.
Render setup
-
Output format - define what will be the link##render-formats[output format] for videos render through the form.
-
Output encoding parameters - optionally, you can add additional encoding parameters to the output format.
-
Webhook URL - define the Webhook URL if you want to be notified on it after the video rendering is done. You can use integration passthrough here to add dynamic elements, read about it in the section below.
-
Webhook passthrough - define what info will be sent through to the webhook.
-
Call webhook on failed render - when enabled, the webhook from the URL above will be called even if the render fails.
-
Call webhook on invalid render - when enabled, the webhook from the URL above will be called even if the render is invalid.
-
Thumbnail frequency seconds - optionally, you can define at which interval you want to create thumbnails from the output video.
-
Skip integrations - when enabled, any Video delivery integration will be ignored.
-
Integration passthrough - send dynamic data to the integrations triggered after rendering. You can use dynamic data here, read how to set it in the section below.
-
Watermark URL - optionally, add a watermark by specifying URL to the watermark.
-
Watermark encoding parameters - optionally, define custom encoding parameters applied to the watermark.
Render from Google Sheet
This integration enables you to trigger video rendering when a new row is added to a specified Google Sheet. The available fields are:
Sheet setup
-
Google account - link the Google account you want to use.
-
Spreadsheet - define which spreadsheet will be used.
-
Worksheet - define which worksheet will be used.
Render setup
-
Output format - define what will be the link##render-formats[output format] for videos render through the form.
-
Output encoding parameters - optionally, you can add additional encoding parameters to the output format.
-
Webhook URL - define the Webhook URL if you want to be notified on it after the video rendering is done. You can use integration passthrough here to add dynamic elements, read about it in the section below.
-
Webhook passthrough - define what info will be sent through to the webhook.
-
Call webhook on failed render - when enabled, the webhook from the URL above will be called even if the render fails.
-
Call webhook on invalid render - when enabled, the webhook from the URL above will be called even if the render is invalid.
-
Thumbnail frequency seconds - optionally, you can define at which interval you want to create thumbnails from the output video.
-
Skip integrations - when enabled, any Video delivery integration will be ignored.
-
Integration passthrough - send dynamic data to the integrations triggered after rendering. You can use dynamic data here, read how to set it in the section below.
-
Watermark URL - optionally, add a watermark by specifying URL to the watermark.
-
Watermark encoding parameters - optionally, define custom encoding parameters applied to the watermark.
Advanced options
Integration passthrough
In some cases you want to send additional data to a Video delivery integration. For example, you might want to send an internal ID, or the name of the folder where video should be uploaded. This can be done using the Integration passthrough field.
Setting the passthrough value
This field is available in the render form, under Integrations section, or via the API by setting the options.integrations.integrationPassthrough field.
The value of this field is always a string, but if a single value is not enough, you can use JSON to send multiple values. For example, if you want to send a folder and internalId you can use the following JSON represented as string:
{
  "options": {
    "integrations": {
      "integrationPassthrough": "{\"folder\": \"My folder\", \"internalId\": 123}"
    }
  }
}
In batch renders, you can incorporate dynamic integration passthrough by utilizing column values from your CSV. If two or more columns are selected, the passthrough will be sent in the {key: value} JSON format.
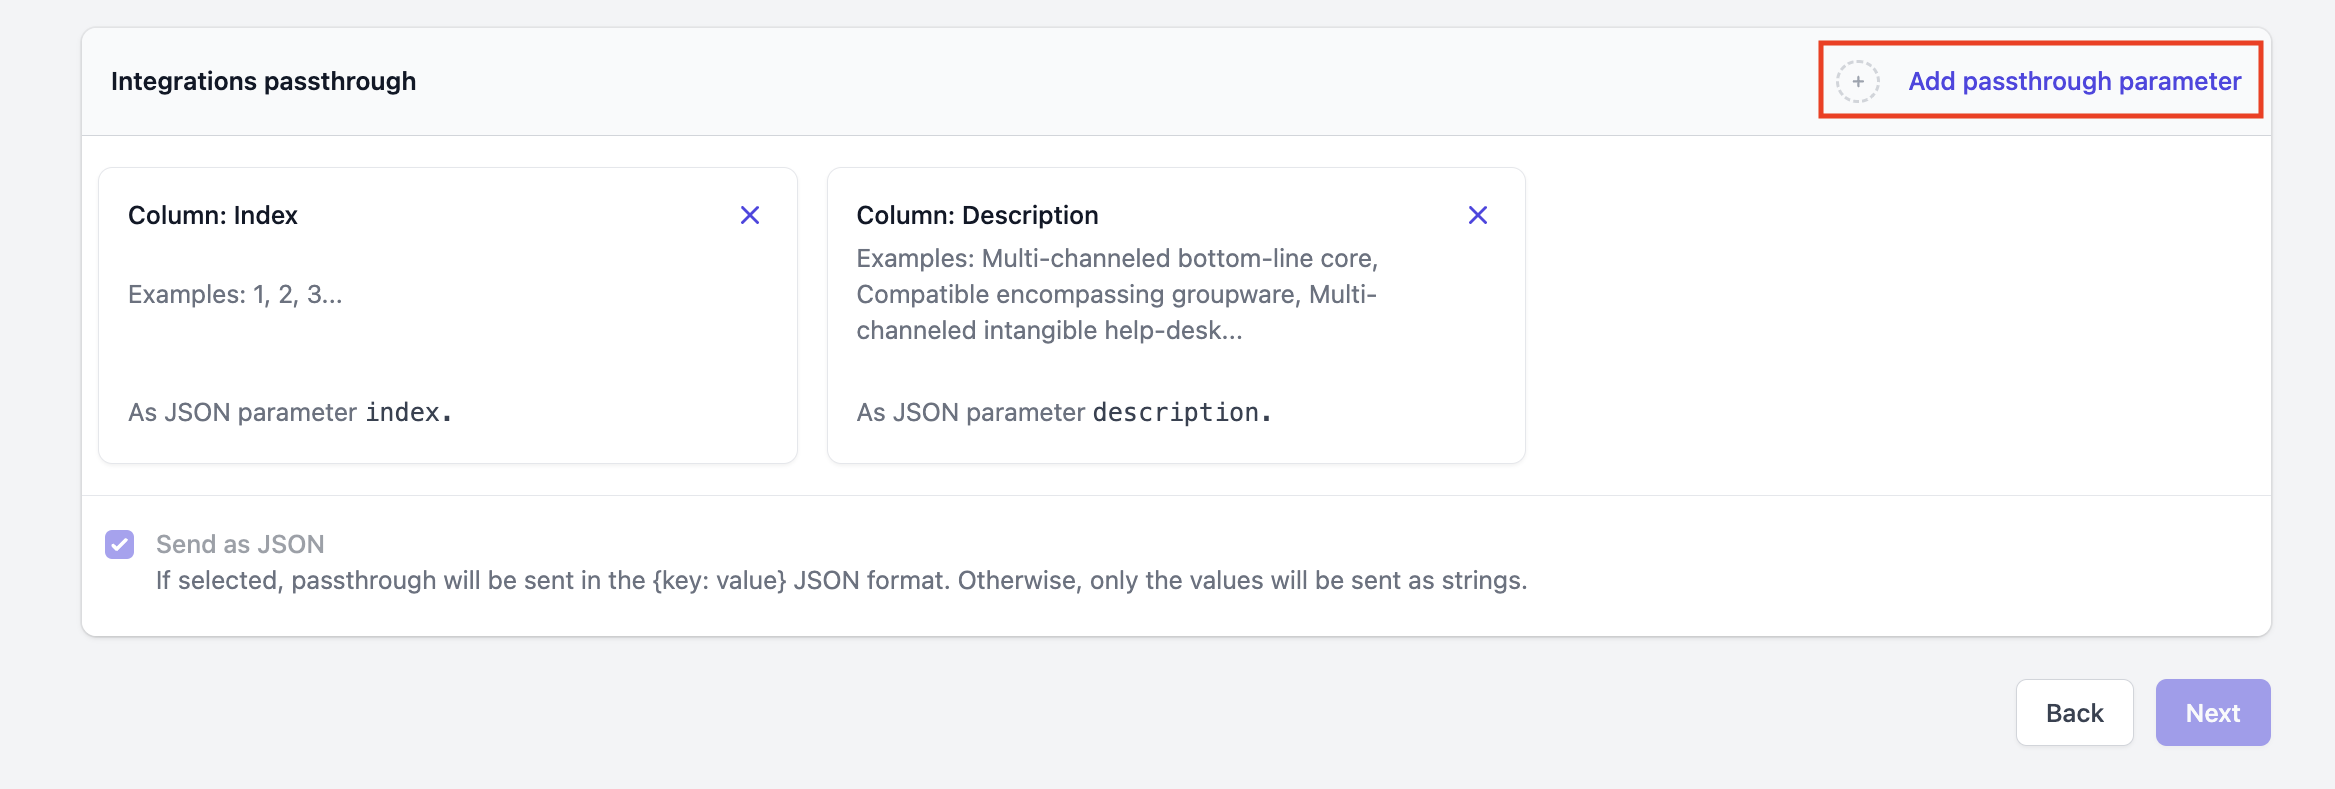
Using the passthrough value
The passthrough value can be used when setting up an integration. For example, if you want to use the string value directly, you can select it by clicking on the + button on the right side of the field:
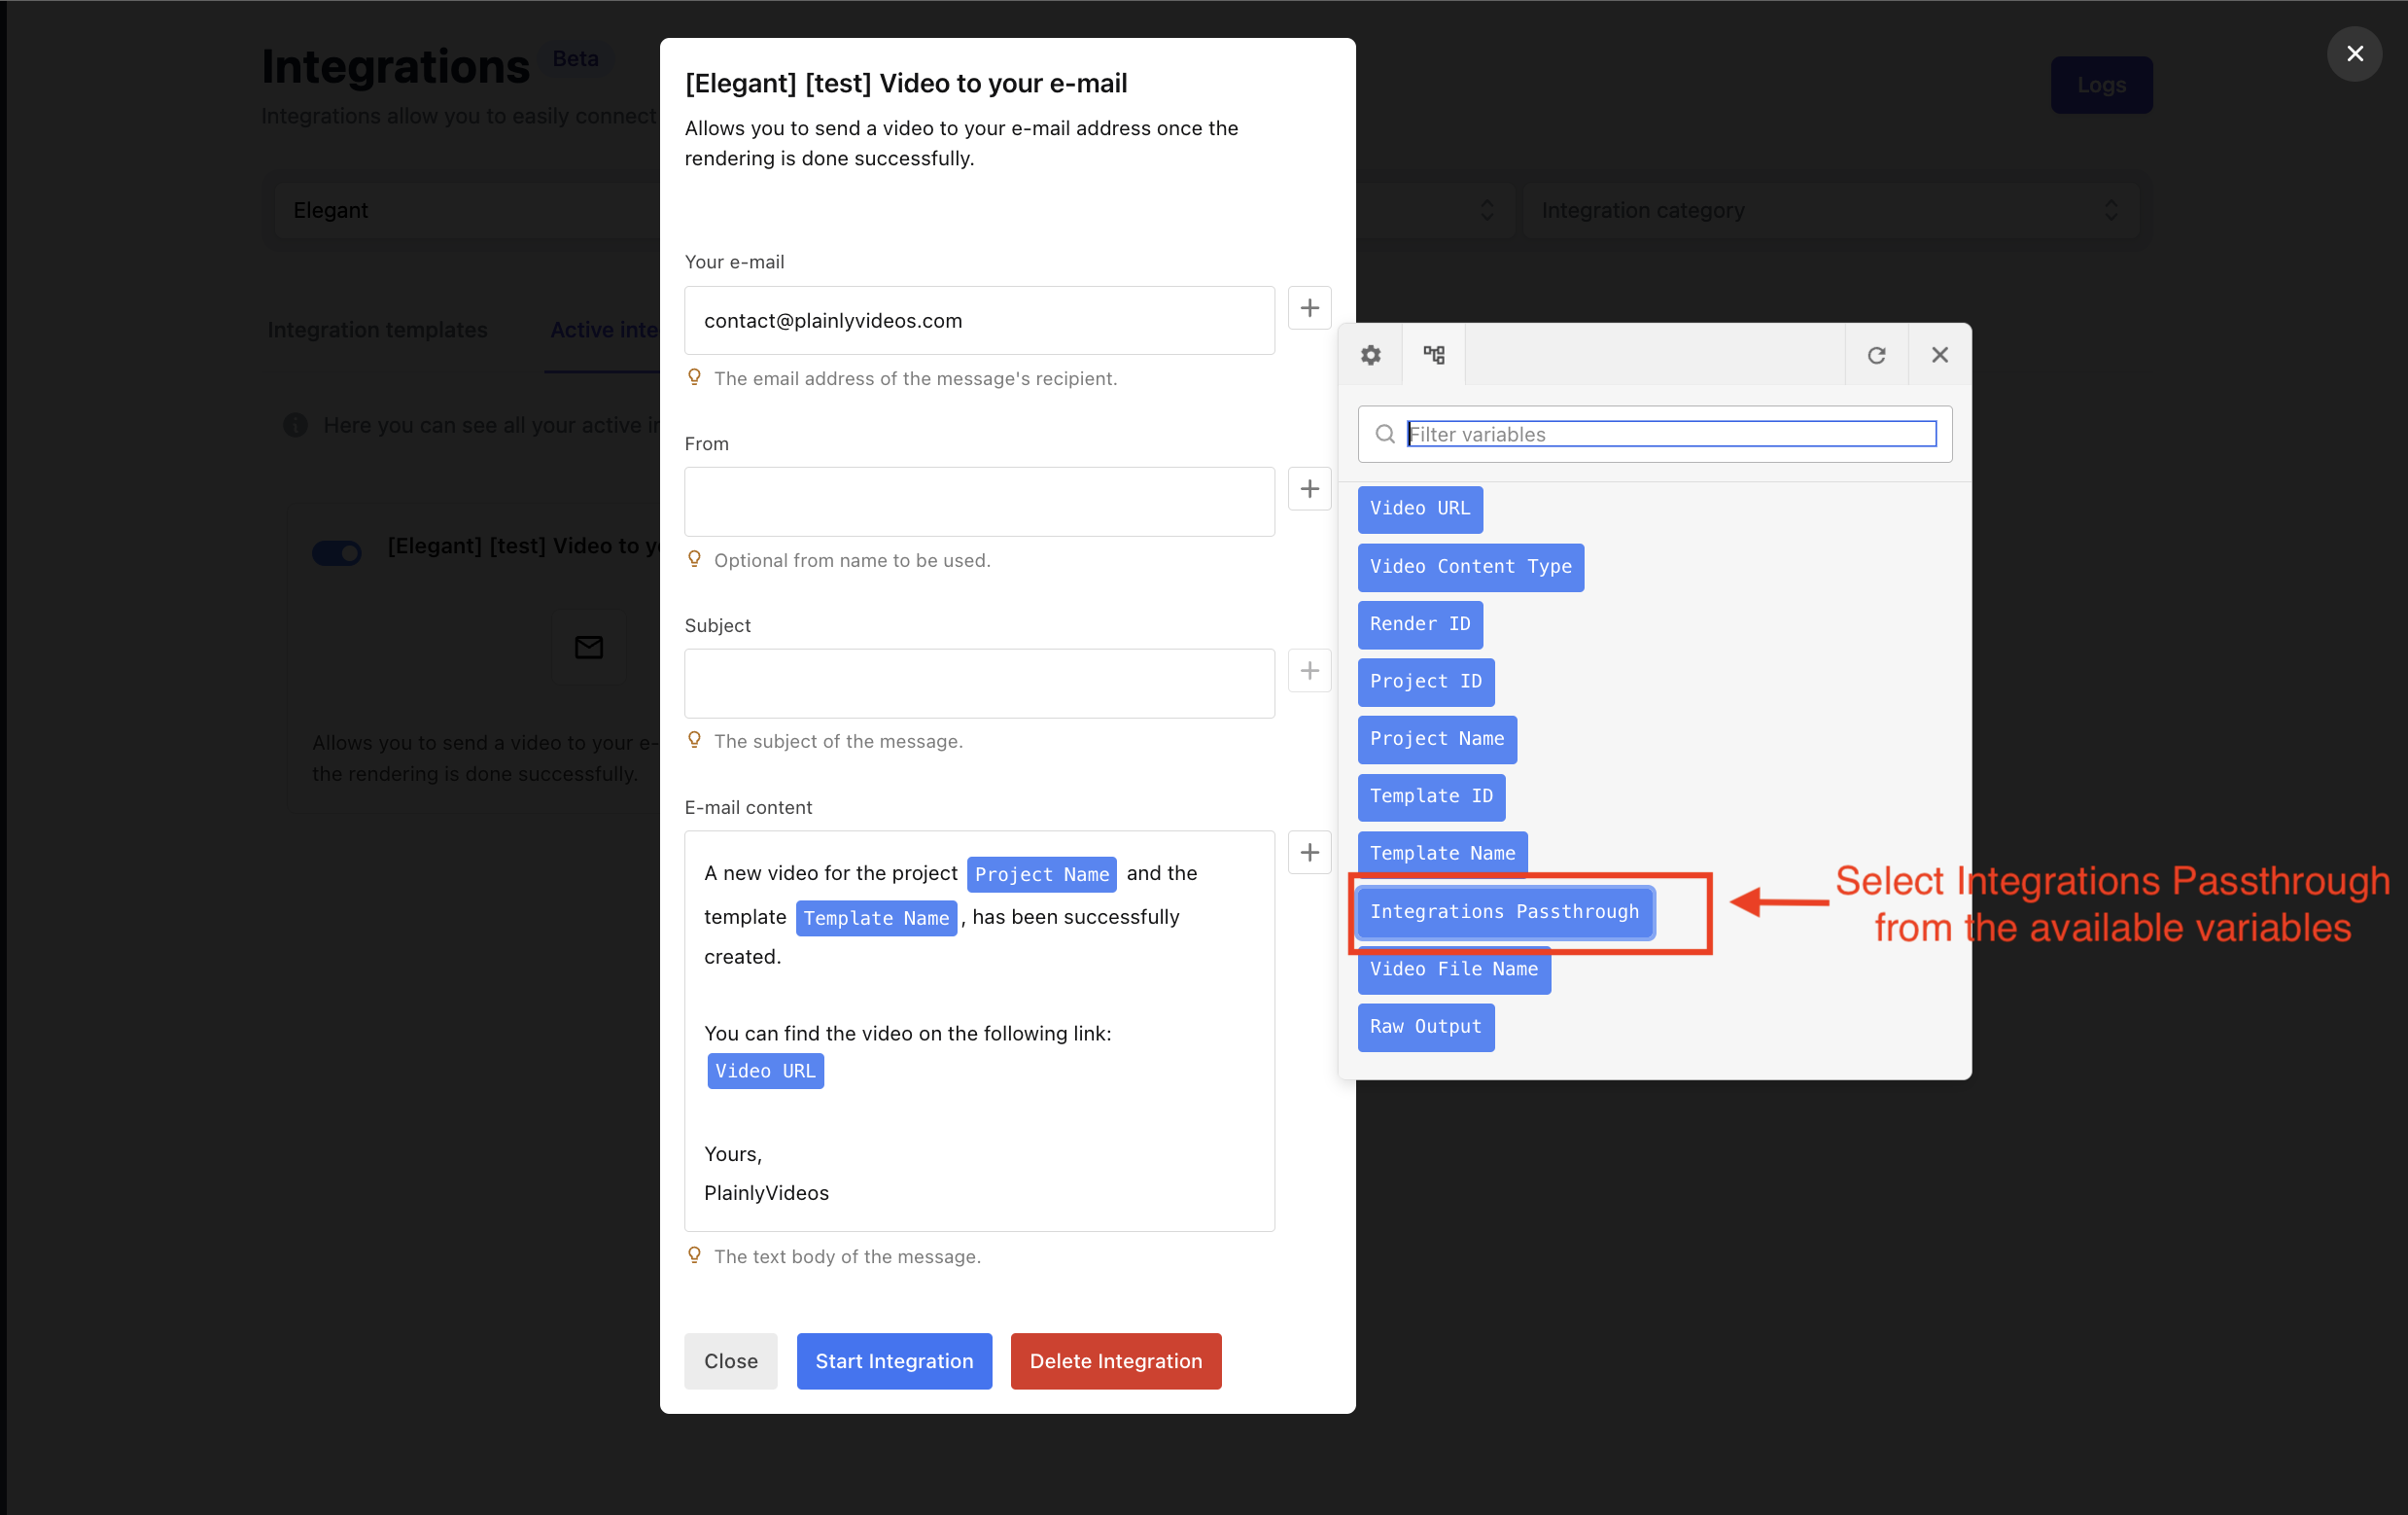
However, if the Integration passthrough value is a JSON, you’ll need to parse it first. You can do this by selecting Integration Passthrough from available variables and then clicking on it in order to open a variable modifier dialog.
First select 'Parse' option in the window that pops up, so that string is parsed to a JSON object. Then, you can select the key from the parsed JSON by utilizing the JSON path action.
| Variable modifier dialog has a test option, so you can test your JSON conversion and path matching before saving it. |

Logs
Every active integration logs its activity. You can see the logs by clicking on the Logs button on the top right side of the integrations page.
The logs are filterable by a time range and name of the integration (using the field Flows).
Logs are especially useful when you are seeing errors in integration executions, as they will give you a detailed error message and a stack trace.
Connected accounts
While you set up integrations you will be connecting multiple 3rd party tool accounts to Plainly. You can see all connected accounts by clicking on the Accounts button on the top right side of the integrations page.
| Accounts page should be used for informational purposes only, however, it allows you to delete an account as well. You should never delete an account that is being used in an active integration. If you do so, the integration will stop working. |
Plainly VideoGenius
Plainly VideoGenius is a new product on the Plainly platform that’s built on top of the Plainly core functionality. Its purpose is to help convert text content into amazing videos that use After Effects templates as a base.
To access it, click on the VideoGenius button in the sidebar.
Setup
Setup is quite simple and straightforward, and it consists out of a few steps.
Adding templates
As with our main product, you have full control over the templates. They are still created in After Effects, and you control the dimensions, the duration, and the design. We don’t restrict you in any way, and you can create the template as you would create a normal video.
There are a couple of best practices which you can see by going to the After Effects best practices section in our user manual.
There are out of the box designs for you to use, in designs category Summary videos.
|
After creating the template:
-
Upload it to our Web App
-
Create a new template, choose your rendering composition
-
Apply the
Scene Managementscript as instructed here -
Click save
Creating a brand
After the template is set up, you can move to the next step. Creating a brand. A brand represents a set of standards that will be used for all the videos that use that brand. You can have as many brands as you want.
When creating a brand, these are the inputs:
-
Name - name of your brand.
-
Logo url - brand logo, that will be used inside the videos related to that brand.
-
Language - default language that will be used in the videos related to that brand (if not specified otherwise later).
-
Website url - website of your brand.
Video types
Once you’ve created your brand, you will be redirected to the Brand details page, where you can define video types for that brand. You can have as many video types as you want per brand .You can also have duplicate video types, for example with different languages. All enabled video types will render whenever you add a new article for that brand - this enables you to render multiple videos from one input.
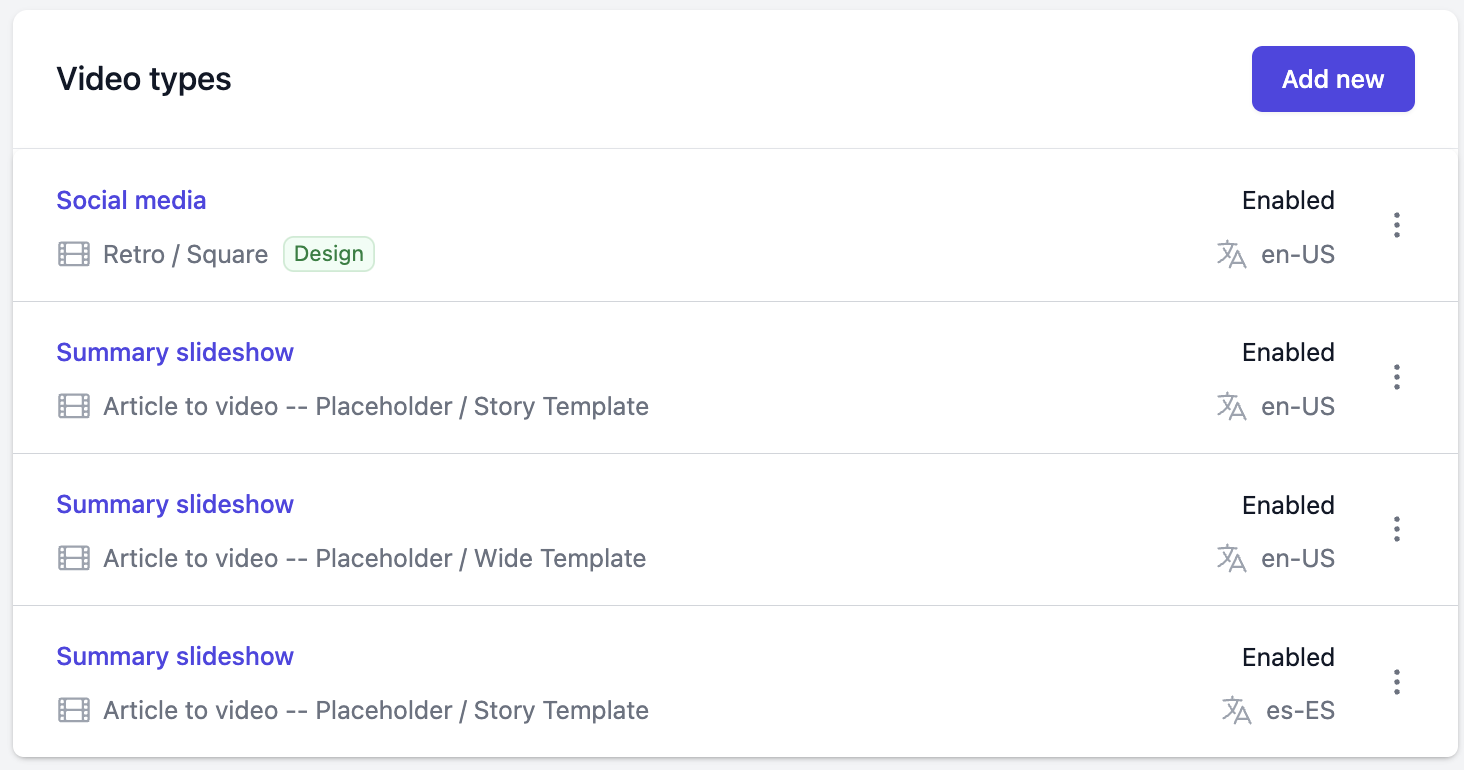
To create a new video type, simply click on the Add new button and fill out the needed fields.
Social media videos
These are short form videos for Instagram, Facebook, TikTok…etc. and their purpose is to promote your articles. Their settings are:
-
Project - Select which project will be used as base for the rendering. You can pick either a custom project or a design.
-
Template - Select a template within the project you selected above.
-
Target language - The target language in the produced videos. Does not need to be the same as the default language of the brand.
-
Default CTA - Default call to action to use in videos.
-
Logo URL - Optional logo URL to use in the videos. If not specified, the brand logo will be used by default.
-
Music - Optional audio URL to use in the videos. If not specified, the music is defined by the video template itself.
Presenter videos
Presenter videos are still in development. Once live they will be similar to summary slideshow videos with one key difference. Presenter videos will also have an AI avatar that will read out the summarized version of your article.
Summary slideshow videos
Summary slideshow videos are videos that summarize an article in an engaging video. The body of the article will be processed (by AI), and it will summarize it, create on-screen text, voiceover, and find relevant stock assets to be used in the video. The settings for this video are:
-
Project - Select which project will be used as base for the rendering. You can pick either a custom project or a design.
-
Template - Select a template within the project you selected above.
-
Target language - The target language in the produced videos. Does not need to be the same as the default language of the brand.
-
Default CTA - Optional, default call to action to use in videos. This usually displays at the end of the videos if the selected project supports it.
-
Logo URL - Optional logo URL to use in the videos. If not specified, the brand logo will be used by default.
-
Stock asset settings - Choose which type of asset should our tool favor when picking them automatically.
-
Summary provider settings - Settings related to the summarization provider such as model and the tone of writing.
-
Voiceover provider settings - Settings related to the automated voiceover, such as voice name, pitch, speaking rate, and the provider itself.
Video creation
After going through the setup, you’re now able to render videos. Video rendering is initiated by adding an article to your brand. This will trigger the creation of all video types enabled for that brand.
You can add an article from the Articles or Brands page, you will need to provide the article URL and the article body.
| We’re adding a scraper that will automatically pull the article body from the URL. That way you won’t need to copy & paste anymore. |
After you add the article, you will be redirected to the Article Details page where you will see the status of your video types and other useful information about the article.
All the video types will automatically start processing. Plainly will first process your article, and create all the needed parameters for the rendering, so that the render can be started. After the rendering is done you can preview the videos by clicking on any of the video types.
| It can occur that title and main article image can not be scraped from the given article link. We depend on the OpenGraph meta tags, which are usually available. If you are experiencing this issue, please check if the article has the OpenGraph meta tags and if they are properly set up. Also, some sites block access for non-human visitors by using security tools like Cloudflare. |
Using the API
As the VideoGenius feature is built on top of the Plainly API, all of its features are accessible by our API. This means that you can use Plainly’s API to automate the creation of videos. To find out more, check out our API documentation.
Video editing
If you wish to edit any of the videos, simply click on it and that will lead you to the Video Details page. Once in the Video Details page, scroll down and click on the Edit revision button. When editing the videos, you will need to get familiar with a few main terms.
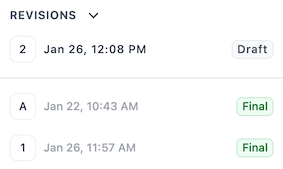
Revisions
Revisions are simply versions of your video. Every video starts with an automated revision that’s created by the AI. You can have multiple revisions, and you can switch between them. New revision is created every time you click on the Edit revision button. Your newly created revision will be in the draft state (more about states under).
You can preview and easily switch between revisions in the top right corner.
Scenes
Scenes are pretty straightforward. Each scene has a voiceover, assets, and on-screen text. The amount of scenes you will have in the video is based on the length of the article, and the maximum is determined by the user when setting up the Scene Management script.
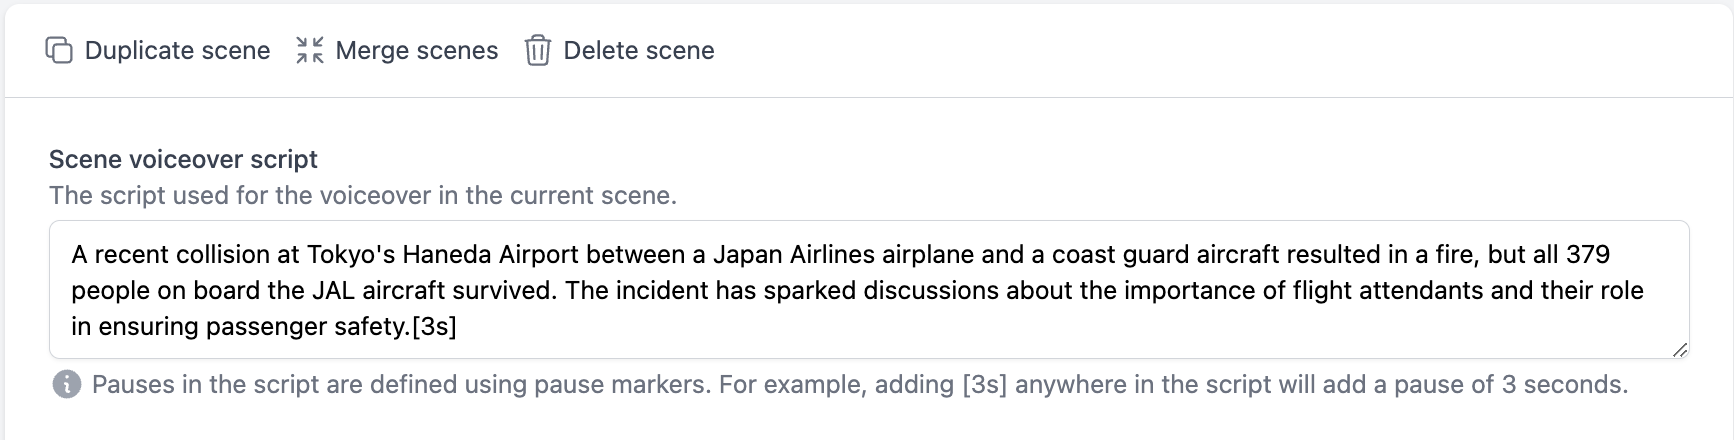
You can quickly go through the scenes in the sidebar on the right. The length of the scenes is determined by the voiceover script in that scene.
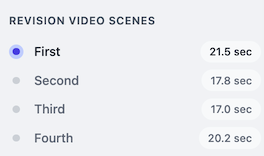
If you want to make a scene shorter, you can do that by removing parts of the voiceover. You can also completely delete scenes or duplicate & merge them.
Scenes are only available for the Summary Slideshow and Presenter video types. Social Media doesn’t have scenes.
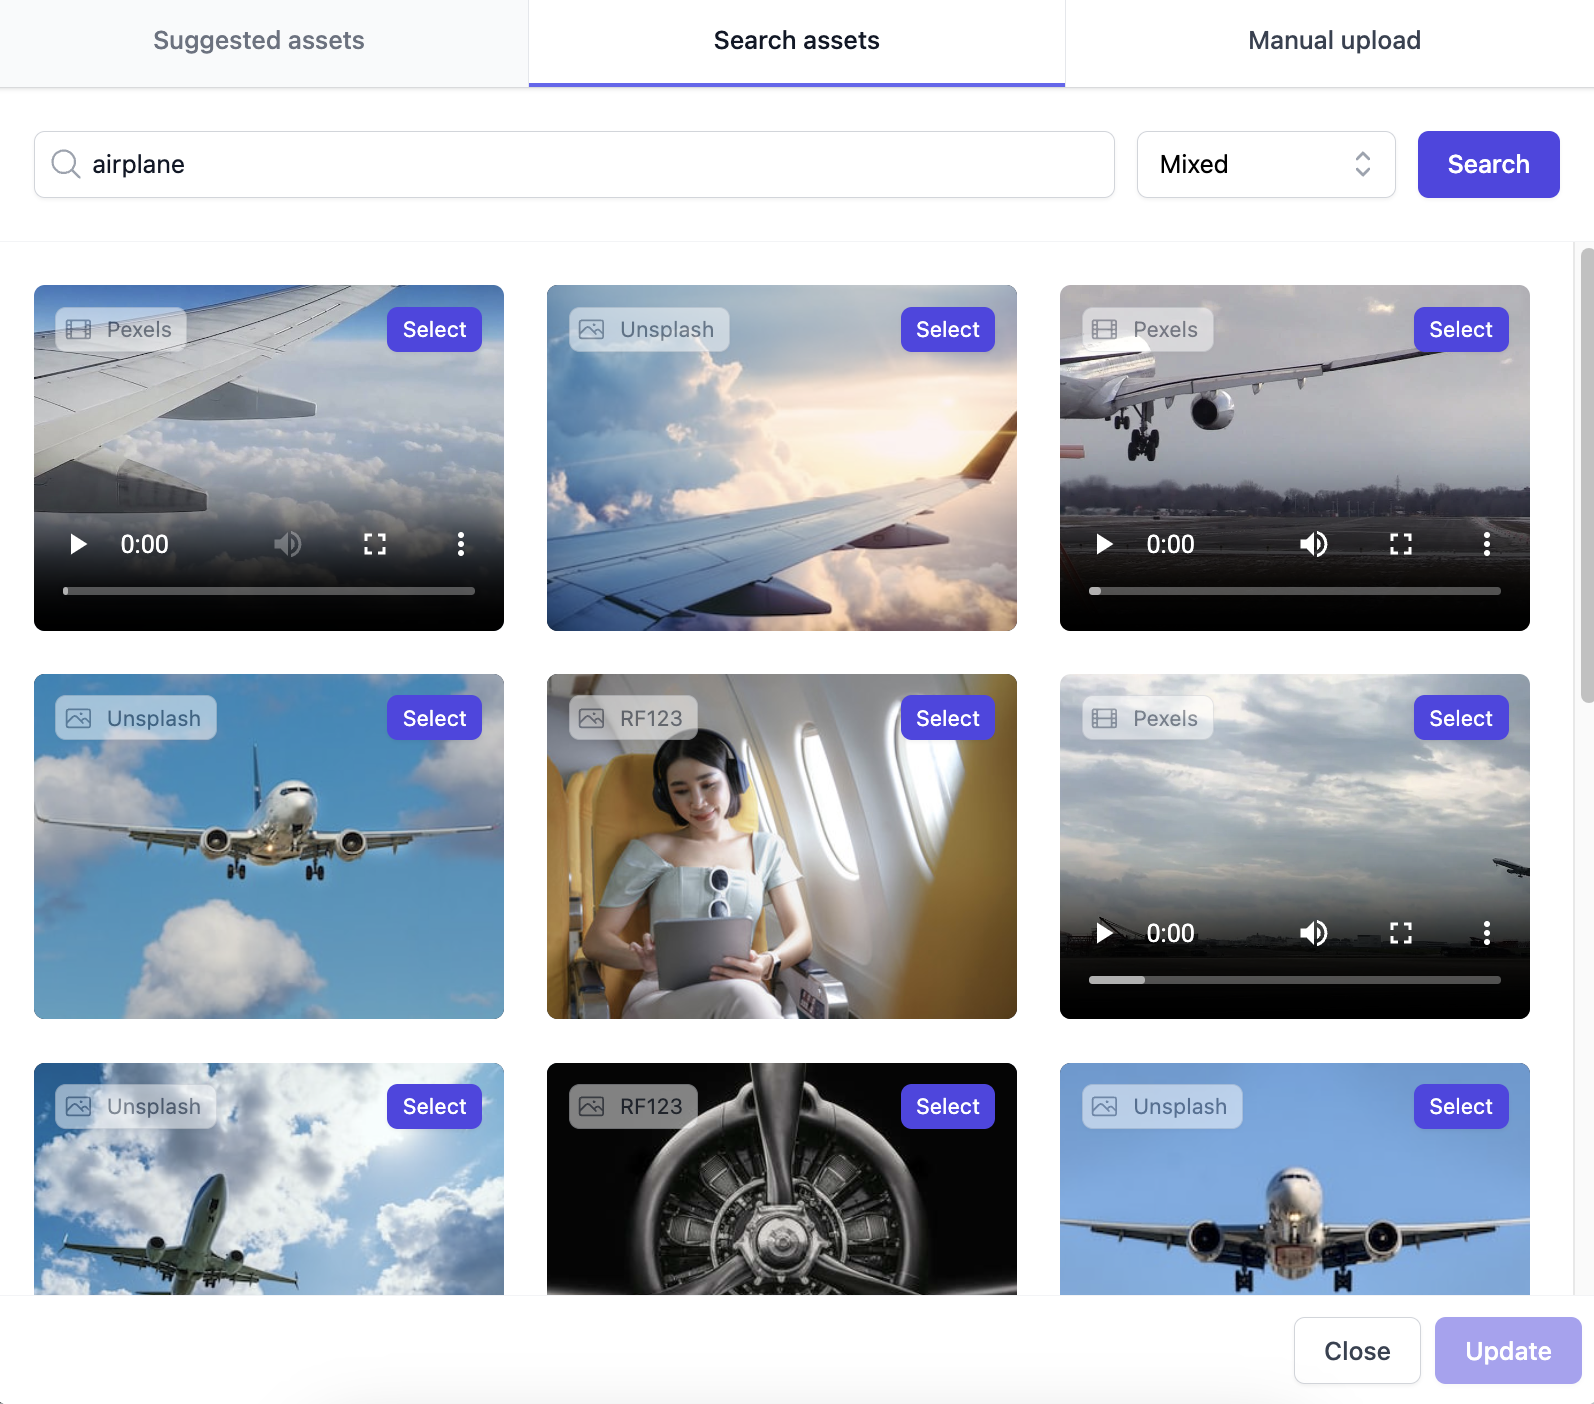
Assets
Assets are videos or images that are contained within the final video. Please note that these are not the graphical elements you have in your template, but rather dynamic videos and images that are replaced for each article.
In the automated revision, which is created by the AI the assets will be automatically picked from our partner stock asset marketplaces. In the editing phase, you can edit these assets, and swap them with other assets from the marketplaces or even add your own.
Each scene has one asset. To edit it, click on the Edit button on the asset preview. That will lead you to the asset selection screen where you can either search for new assets or add your own.
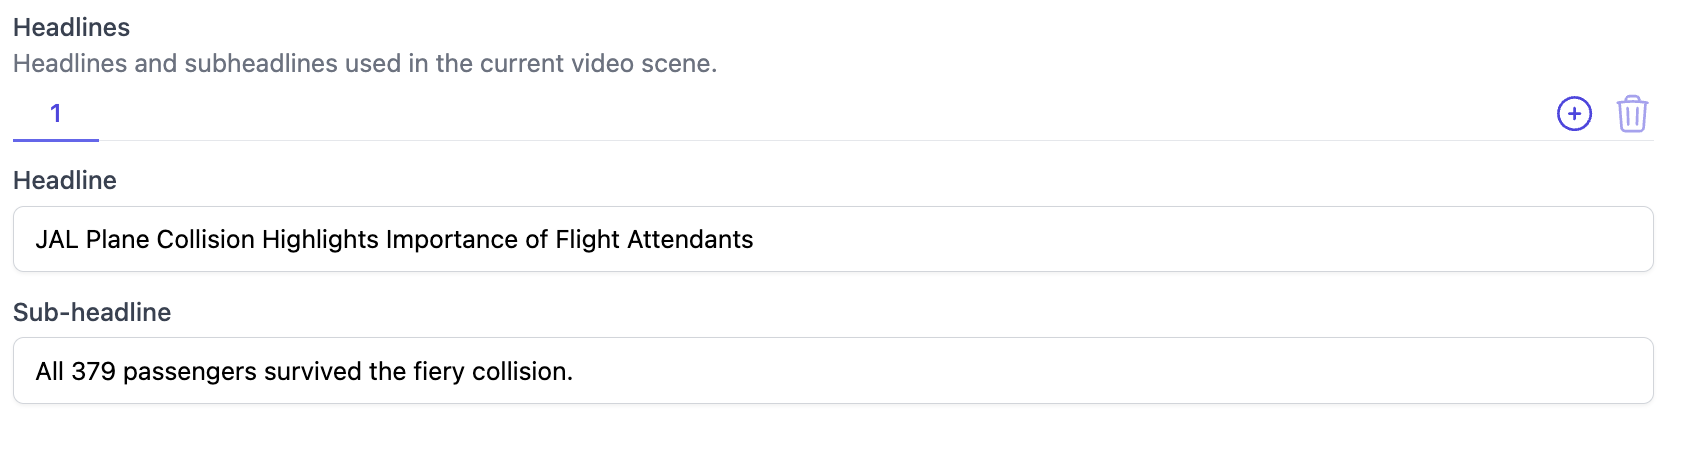
Headlines/sub-headlines
Headlines and sub-headlines are the on-screen text displayed in every scene. The maximum amount of headlines/sub-headlines per scene is determined by the user while setting up the Scene Management script. Please note that the max headline number needs to match the number of headlines you have in your After Effects template.
You can freely edit, add, or delete the headlines using the interface below.
States
After making all the edits, you can click on the Save draft button to save the inputs you made. To initiate rendering, you will need to click the Render revision button. There are multiple states in which the revision can be:
-
Processing- Video is being processed. -
Draft- Revision is in draft state, this means you are in edit video mode, you can make as many changes as you want to the current video. Once you submit your changes with eitherRender revisionorRender finalyou will proceed to the next state and video will be rendered. -
Preview- Revision is in preview state, this means that the revision has been rendered, and you can preview it. The reason why the revision might ever be in the preview state is that a paid asset is being used in the revision. If you are satisfied with the preview, you can render the final video. -
Final- Revision is in the final state, this means that the video is rendered and ready to be downloaded. -
Error- Revision is in an error state, this means that something went wrong during the rendering process. You can try to render it again or edit the content and setup.
| We’re adding a feature that will automatically apply the edits you make on the video type to the other video types for that article. This will make the editing process even more streamlined. |
Video distribution
After rendering, the videos will be stored on our cloud storage for a limited period (depending on your subscription). You can manually download them either from the Renders page in the main sidebar or by navigating to the submitted article, then video type, and then clicking on the Preview button.
Troubleshooting
Analysis Issues
A lot of analysis fails are caused by the same things that cause failed renders. It’s suggested that you take a look at the section below as well and troubleshoot.
Unsupported After Effects version
Plainly currently supports After Effects versions from 2022 to 2024. If you’re using a different version, you will get a failed analysis. In that case, the error message in the UI will look like this:
{
  "error": "Unsupported version of After Effects."
}
Missing files
If your project uses asset files (images, video, audio, etc.) that are not included in the .zip file you uploaded, you will get a failed analysis. In that case, the error message in the UI will look like this:
{
  "message": "Rendering error.",
  "errors": [
    "aerender ERROR: Error executing script: C:\\Users\\plainly\\AppData\\Local\\Temp\\nexrender\\89a2d081-5f1a-4b50-807f-cb79fa71890f\\nexrender-89a2d081-5f1a-4b50-807f-cb79fa71890f-script.jsx",
    "Error: Project has missing files.",
    "aerender ERROR: Runtime error in After Effects."
  ]
}
See guide on collecting assets for more info on how to solve the issue.
| If you have a non-English character in your file name, the errors would as well, as the file would be considered missing due to the unsupported encoding. |
Unsupported files in a project
Some media formats or files inside your project are not supported by Plainly. These usually fail into 2 categories:
The error message in the UI will look like this:
{
  "message": "Rendering error.",
  "errors": [
    "aerender ERROR: Error executing script: C:\\Users\\plainly\\AppData\\Local\\Temp\\nexrender\\1d83abf2-7b5b-482e-bbf9-27bf83d3df5c\\nexrender-1d83abf2-7b5b-482e-bbf9-27bf83d3df5c-script.jsx",
    "Error: After Effects error: Could not read from source. Please check the settings and try again.",
    "aerender ERROR: Runtime error in After Effects."
  ]
}
Font issues
If your project uses fonts that are not included in the .zip file you uploaded, you will get a failed analysis. In that case, the error message in the UI will look like this:
{
  "missingFonts": ["ArialNarrow"],
  "message": "Font validation failed: 1 font(s) missing. 1 not needed font(s).",
  "extraFonts": ["Tungsten-Book"]
}
Please have a look at the Font Management section for more info on how to solve the issue.
Rendering Issues
The stability of our platform is one of our main focuses, but still, bugs will happen from time to time. These bugs happen mostly when you are using a custom project and in the form of failed renders.
Here’s a list of things you can try to do in order to fix this:
| First off, try re-rendering again. |
Issues with a project that was already set up and working.
If you’re experiencing failed render with a project that you already set up you probably changed something and used the "Edit" project button. These issues appear when you change a layer that was parametrized. If you use the "Edit" project button, Plainly expects no changes when it comes to parametrized layers. You can change the source file, their animation and similar but you can’t delete them or change them. If you do, however, delete or change those layers you need to delete them from the parametrized layers list and save the template again. If you change a name of a parametrized layer, delete it from the parametrized layers list, save the template and add the parametrization to the layer again.
Using non-English characters in names
Right now we only support English characters. If you have non-English characters in your asset names, or any file you upload to Plainly you will probably get a failed analysis or render.
Applying duplicate scripts
When applying scripts, make sure that you don’t apply duplicate scripts to the same layer.
Wrong After Effects version
Sometimes, even if the analysis goes through that doesn’t exclude the option that you selected wrong After Effects version. Double check that you selected the correct AE version during project upload.
Using unsupported asset files
Adding unsupported asset files in your After Effects project, or sending them during render will always cause a failed render. For example, .mov media or assets in HEVC and HEIC formats are not supported.
As a rule of thumb, make sure you’re using .jpg / .png / .mp4 / .mp3 and .wav files. These are enough to cover all your needs.
Audio not playing properly
If you’re experiencing issues with audio, try using .wav files instead of .mp3.
Using Illustrator / Photoshop files
It’s always a good idea to convert any Illustrator / Photoshop files into .png and .jpg.
Fonts not showing
If you don’t see your fonts in the final render, double check if you added the right font files in your .zip during the custom project upload. See Font Management for more info.
AE effects causing issues
In very rare occasions, a certain AE effect will cause issues. If you went through the whole list from above, and you are still experiencing failed renders or analysis you probably have a certain AE effect in your custom project that’s causing an issue. Go through your project, turn off effects and troubleshoot them one by one.
| If you read this whole list, and none of this applies, reach out to us at contact@plainlyvideos.com and we’ll help you out! |